Improving Metadata and Discoverability
Last updated on 2026-07-07 | Edit this page
Overview
Questions
- What metadata makes research software easier to find and reuse?
- How can we improve discoverability across GitHub, Zenodo, and scholarly indexes?
Objectives
- Identify key metadata elements that increase visibility and reuse.
- Enhance discoverability using GitHub features and Zenodo metadata fields.
- Connect metadata across CITATION.cff, GitHub, and your DOI record for consistency.
- Supporting others: audit a repository’s metadata and prioritize the single highest-value fix.
Findability comes from description
A Zenodo record with a bare title and no keywords is a catalog record with no subject headings: retrievable if you already know it exists, invisible if you don’t. Most research software sits behind exactly that kind of record. This episode is the one where the lesson lands fully inside a library audience’s expertise, because making things findable through description is what libraries do. The systems are GitHub topics, Zenodo fields, and a README instead of a catalog, but the judgment, what would a seeker search for and does this record contain it, is unchanged.
Clear metadata helps others understand, evaluate, and find your software.
It also reduces the cognitive effort for future users because essential information is organized and easy to locate.
In earlier episodes, you created:
- a CITATION.cff file
- a license
- a repository structure
- a Zenodo record with a DOI
This episode brings these together. You will describe your project in consistent ways across platforms so search engines, citation tools, and colleagues can discover it.
What counts as useful metadata?
Good metadata answers predictable questions with minimal effort from the reader:
- What is this software? (short description or abstract)
- Who made it? (authors, ORCIDs)
- How do I cite it? (CITATION.cff + DOI)
- What domain is it for? (keywords)
-
What else does it relate to?
- related article DOI
- datasets used
- funding source
- project website
- related article DOI
You may add these in multiple places, but they should remain consistent. This is authority control: the title, authors, and description should read the same in the README, the CITATION.cff, and the Zenodo record, for the same reason a name reads the same across catalog records. When they drift, indexes treat one piece of software as several, and its citations scatter.
GitHub-specific discoverability features
GitHub uses structured metadata to improve search ranking and cross-repository linking.
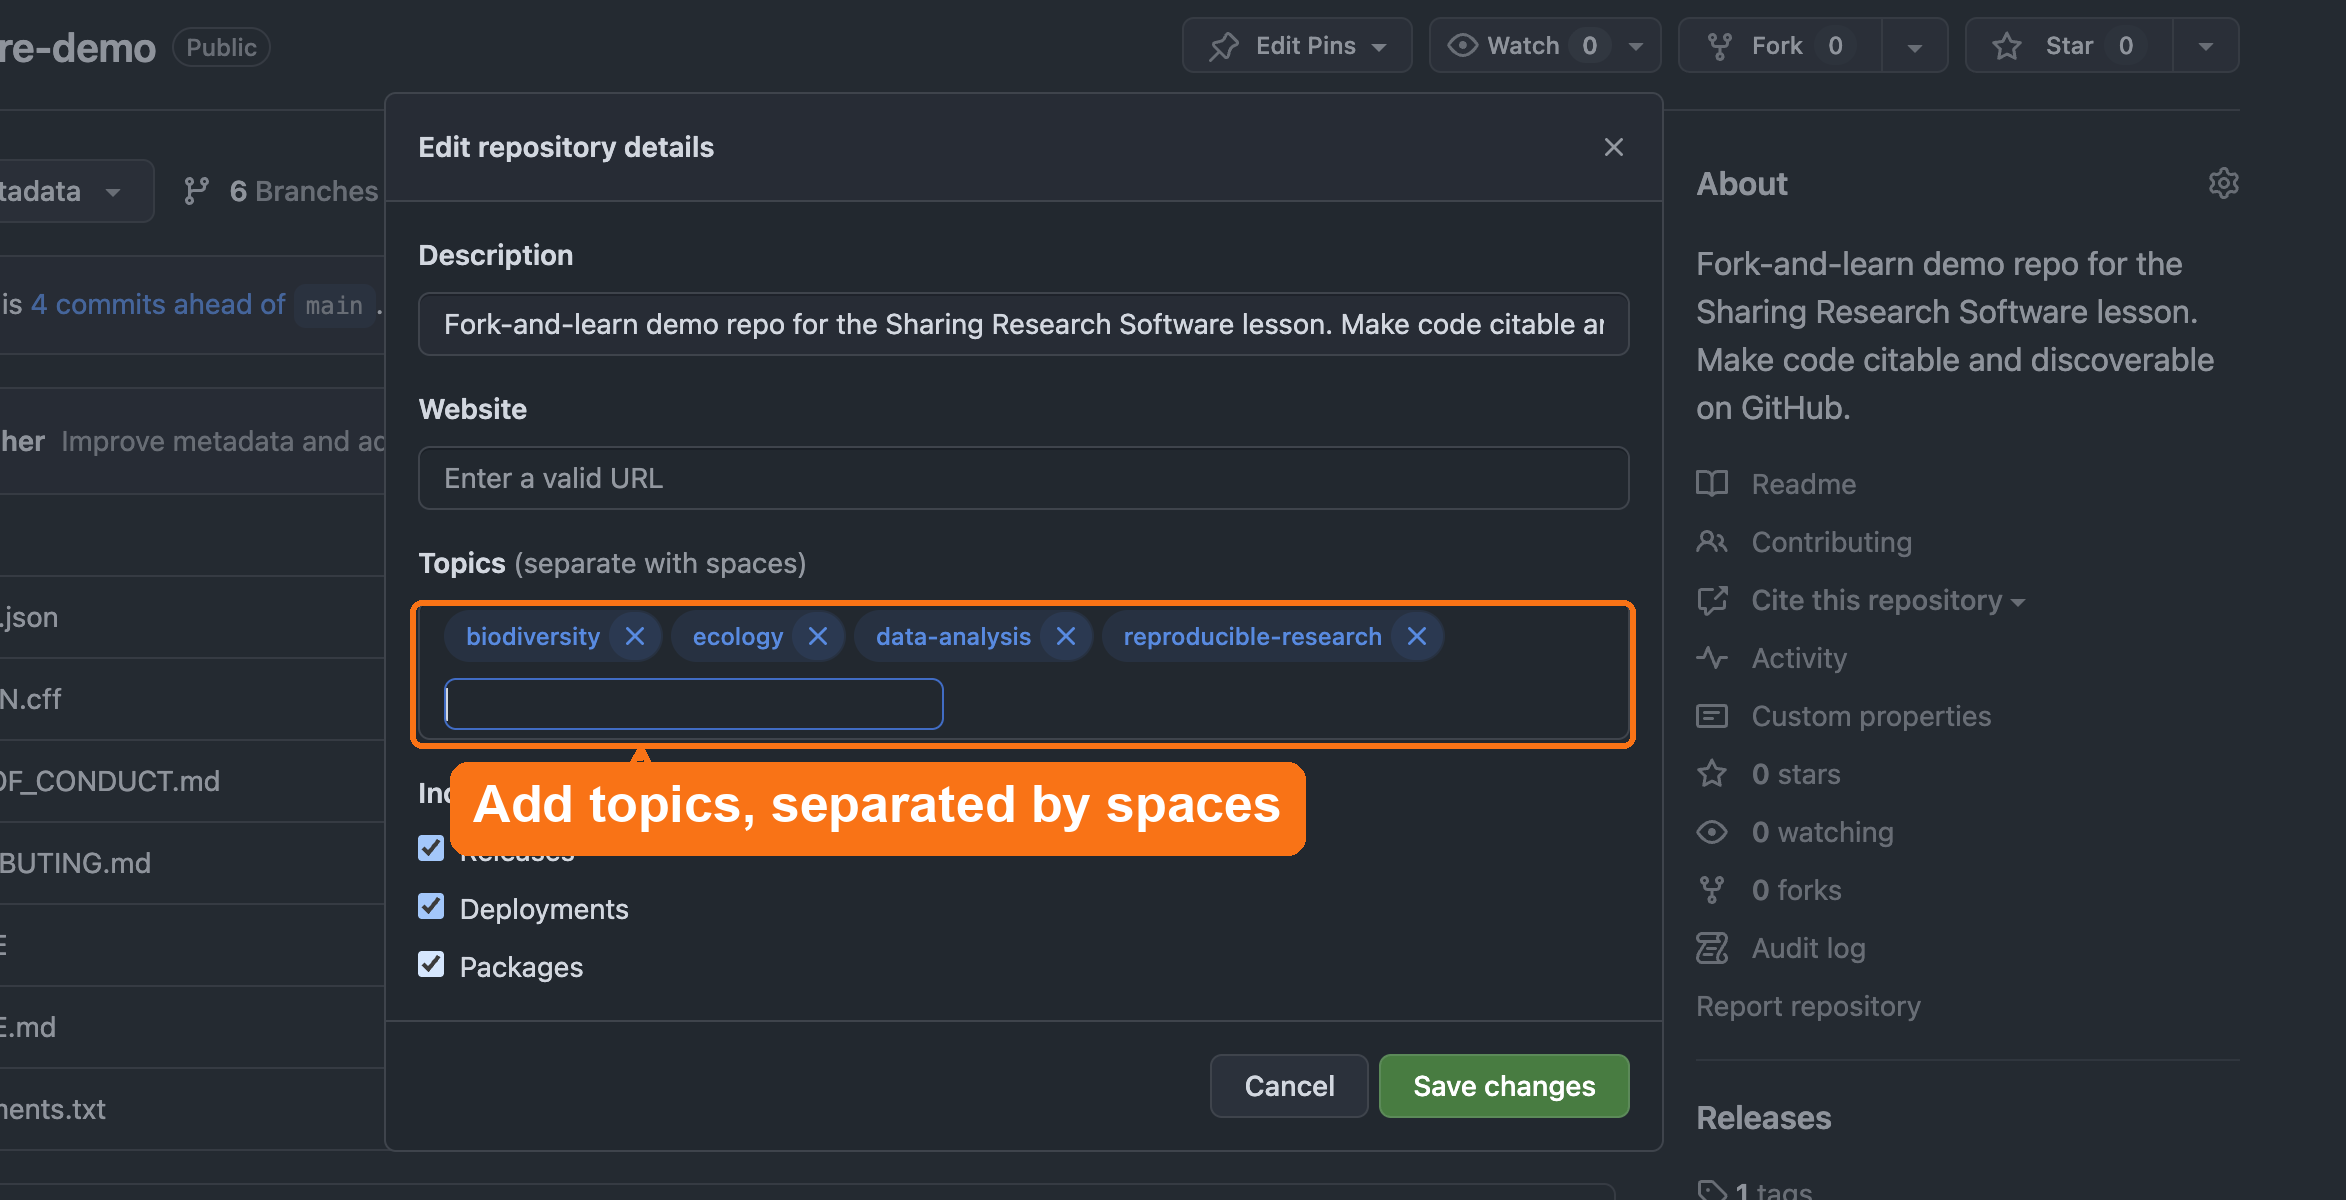
Add these items in
Settings → General → Topics:
- discipline tags (e.g.,
geospatial,text-mining,materials-science) - methodological tags (
simulation,visualization,machine-learning) - language tags (
python,r)
Writing an Effective README
The 30-Second Rule
Your README is your software’s front door.
If users can’t understand what it does, how to install it, or how to use it in 30 seconds → they leave.
A collection without a finding aid can only be used by someone with time to read every box. A repo without a real README can only be used by its author. The 30-second rule is scope-and-content note discipline applied to code.
README Structure (7 Essential Sections)
The UC OSPO README Guide (UC-specific) recommends this standard structure:
- About: What does this do? (2-3 sentences)
- Features: Key capabilities (Reproducible, Citable, Open source)
- Getting Started: Prerequisites + installation
- Usage: Minimal working example
- Citation: Link to CITATION.cff or DOI
- License: Explicitly state terms (e.g., “BSD-3 - see LICENSE file”)
- Contact: How to get help
Before vs. After Example
❌ Before (main, starting state)
MARKDOWN
# Biodiversity Analysis Toolkit

A script.

No description. No instructions. No citation. Unusable.
✅ After (after-metadata)
MARKDOWN
# Biodiversity Analysis Toolkit

Analysis tools for biodiversity research.

## Features
- Citable (DOI) • Open source (BSD-3) • Documented

## Getting Started
```bash
pip install -r requirements.txt
python src/analysis.py
```

## Citation
[zenodo.org/badge/DOI/10.5281/zenodo.123456.svg]

License: BSD-3 - see LICENSE file
Professional. Citable. Usable.
README Best Practices: 5 Quick Tips
- Clear description → Answer “What problem does this solve?”
- Show, don’t tell → Include code examples
- Link metadata → Add DOI badge, link CITATION.cff
- Keep updated → Refresh when features change
- Use a template → UC OSPO Templates (UC-specific) or Awesome README
Every tip maps to FAIR principles.
Don’t Reinvent the Wheel
- Awesome README: curated examples from real open-source projects
- UC OSPO README Template (UC-specific): ready-to-use template
It is also critical to link your metadata:
- Add a badge for your Zenodo DOI
- Link to your
CITATION.cfffile
A structured README ensures researchers can quickly evaluate and use your software.
Beyond the README: Community Health Files
Beyond technical metadata, files that describe how to interact with your project matter for long-term sustainability and for signaling that the project is welcoming.
GitHub looks for these files:
CONTRIBUTING.md → How to contribute
The CONTRIBUTING.md file is the first place new
contributors look to see if a project is open to participation.
Following a contributing guide template (the UC
OSPO Contributing Guide (UC-specific) is one good example)
ensures you cover essential ground:
- Welcome Statement: Explicitly inviting others to join
- Ways to Contribute: Identifying non-code contributions (e.g., documentation, testing, issues)
- Setup Instructions: How to get the project running locally
- Pull Request Lifecycle: What happens after a contribution is submitted
CODE_OF_CONDUCT.md → Behavioral standards
A CODE_OF_CONDUCT.md establishes behavioral expectations
and ensures a safe, inclusive environment for all researchers. The
standard choice is the Contributor Covenant,
widely adopted across open-source projects. (See also: UC
OSPO Code of Conduct Guide (UC-specific))
CHANGELOG.md → Version history
A CHANGELOG.md documents what changed between versions.
This helps users understand:
- What’s new in each release
- What bugs were fixed
- What breaking changes occurred
- How the software evolved over time
Why it matters: Signals your project is professionally managed and welcoming.
Templates Available
- Choose a License: license selection
- Contributor Covenant: code of conduct template
- Keep a Changelog: changelog format guide
- UC OSPO Template Repository (UC-specific): ready-to-use CONTRIBUTING.md, CODE_OF_CONDUCT.md, CHANGELOG.md, README.md
Adding these files to your repository root helps GitHub display a “Community Standards” checklist in your insights, signaling that your project is professionally managed and ready for collaboration.
GitHub recognizes certain filenames
You have now seen this pattern several times: name a file the way GitHub expects and the platform does more than store text. It may offer a template, add a link to the sidebar, tick an item on the community checklist, or route issues, security reports, and citations. A few worth knowing:
| File (in the repo root, unless noted) | What GitHub does |
|---|---|
README.md |
Renders as the repository’s landing page |
LICENSE |
Offers a license-template picker; shows the detected license |
CITATION.cff |
Adds the “Cite this repository” link with ready-made APA/BibTeX |
CODE_OF_CONDUCT.md |
Offers a code-of-conduct template; counts toward the community profile |
CONTRIBUTING.md |
Links contributor guidelines when someone opens an issue or PR |
SUPPORT.md |
Points people to your support channels from the new-issue screen |
SECURITY.md |
Becomes the security policy; “report a vulnerability here, not in a public issue” |
.github/ISSUE_TEMPLATE/*.yml |
Turns “New issue” into a structured intake form |
Two caveats worth passing on in a consultation: most of this only appears after you commit the file to the default branch, and an organization’s policies can disable or constrain some features. GitHub also changes these helpers over time, so teach the pattern (“the filename is a signal”) rather than the exact button.
Institutional Repositories: Dataverse, Dryad, and Zenodo
Many institutions use repositories like Dataverse or Dryad for research data deposits. These are good for datasets but have limited software support; they don’t integrate with GitHub releases or mint version-specific DOIs automatically.
For software, Zenodo is the recommended deposit location because:
- It integrates directly with GitHub to archive each release automatically
- It mints a DOI for every version
- Records flow into DataCite and are indexed by Google Scholar and library catalogs
- It’s free, CERN-operated, and widely recognized by journals and funders
What about your institution’s repository?
If your institution requires or prefers a local IR (Dataverse instance, DSpace, etc.), you can deposit there in addition to Zenodo, not instead of it. Use the Zenodo DOI as the persistent identifier in your CITATION.cff, and note the institutional deposit in your README or Zenodo metadata as a related work.
Some funders (NSF, NIH, Wellcome Trust) have specific deposit requirements. Check your award terms before deciding where the authoritative copy lives.
Zenodo and DOI metadata
When you deposit software on Zenodo, the record flows into:
- DataCite: the DOI registration agency for research data and software; DataCite records are harvested by library catalogs, institutional discovery systems, and tools like OpenAlex and Scholix
- Google Scholar: picks up Zenodo records with structured metadata
- Library catalogs: many discovery layers (EBSCO, Ex Libris Primo, OCLC WorldCat) harvest DataCite metadata, meaning your software can appear in a library search alongside journal articles
- Domain repositories that harvest DOIs
What this means practically: the metadata you put into your Zenodo record is the metadata that librarians and discovery systems see. Thin metadata (no description, no keywords, no author ORCIDs) limits findability even if the DOI is valid.
.zenodo.json overrides
CITATION.cff
If a repository contains a .zenodo.json file, Zenodo
uses that file for the metadata of a GitHub-archived
release and ignores CITATION.cff. The two files can drift
apart, so if you add a .zenodo.json (some projects do, for
richer Zenodo fields), keep the authors, title, and keywords consistent
with your CITATION.cff, or you will publish two different
citation records for the same software.
Add or refine:
- authors + ORCIDs
- keywords (discipline tags, method tags, language tags; use the same ones you add to GitHub Topics)
- related works (link to the paper that used this software, the dataset it analyzes, the grant that funded it)
- funding references
- version notes
- a readable software description (2-3 sentences; think abstract, not README)
Your goal is context. A researcher or a librarian helping a researcher should be able to read the Zenodo record and decide in 30 seconds whether this software is relevant to them.
Supporting others
Metadata work is where libraries already have deep expertise, so this is the most natural consultation territory in the lesson. The trap is trying to perfect everything at once. In practice you are doing triage: identifying the single highest-value fix for the time the researcher actually has.
A rough priority order when a record or repo is thin:
- A readable description (most discovery systems show this first; an empty one is the biggest single loss).
- Author ORCIDs, so credit attaches to people, not just names. Every J. Chen on Zenodo is indistinguishable without one, and software credit is hard enough to accumulate without splitting it across identities.
-
Keywords reused consistently across GitHub Topics,
CITATION.cff, and Zenodo. - Related works linking the software to its paper, dataset, and grant.
Because this metadata is harvested by DataCite, library discovery layers, and Google Scholar, the librarian framing is concrete: thin metadata means the software never surfaces in the catalog alongside the article. You are not just tidying a record, you are deciding whether it is findable at all.
Challenge 1: Identify Useful Metadata
List three elements you would add to improve a repository’s discoverability.
Examples:
- ORCID IDs for each author
- Keywords describing the domain and function
- A link to a related article or dataset
- A project description in your README
- Funding acknowledgment
Challenge 2: Improve Your Zenodo Record
After generating a DOI in the earlier episode, expand its metadata:
- Open your Zenodo record.
- Select “Edit.”
- Add:
- keywords
- authors and ORCIDs
- description
- related publication DOIs
- funding
- keywords
- Save and publish the updated record.
Which change makes it discoverable?
A researcher’s tool has been public on GitHub for a year, but no one outside their lab has ever found it. The repository has a one-line README, no topics, and a Zenodo deposit with only a title. Which single change will do the most to make the software discoverable?
A. Add collaborators so the repository is “more public” B. Add descriptive GitHub topics, plus matching keywords and a description on the Zenodo record C. Push more frequent commits so the repository looks active D. Rename the repository to something shorter and catchier
B. Discovery happens through description, not access level or activity. Topics, keywords, and descriptions are what GitHub search, Zenodo, and DataCite-fed indexes actually match a query against. The repo is already public, so A adds nothing to discoverability; commit frequency (C) does not affect search ranking for discovery; and a shorter name (D) is cosmetic. This is the same reason a catalog record with no subject headings is nearly invisible: findability comes from the metadata, not from the object’s mere existence.
- Metadata increases discoverability in GitHub, Zenodo, and scholarly
indexes.
- Use consistent information across CITATION.cff, README, GitHub
topics, and Zenodo.
- Thoughtful metadata supports FAIR principles and helps others reuse your software.