All in One View
Content from Introduction: Software as a Citable Research Output
Last updated on 2026-07-07 | Edit this page
Estimated time: 25 minutes
Overview
Questions
- Why is research software so often uncredited and hard to find?
- Why isn’t a GitHub URL a real software citation?
- How do FAIR4RS principles make software citable and discoverable?
Objectives
- Explain why research software is often uncredited, unfindable, and at risk of loss
- Explain how FAIR4RS principles apply to research software
- Identify the key components that make software citable and discoverable
- Given a repository, name the single highest-value next fix for its citation, licensing, or discoverability
- Supporting others: explain to a researcher, in their terms, why these practices are worth the effort
Software Is the Missing Scholarly Output
A faculty member emails: “The journal accepted my paper, but they want a citable version of the code, with a DOI. How do I do that?”
Ten years ago the same question arrived about datasets, and the library built the answer. When a journal article is published, a whole system catches it: a persistent identifier, a catalog record, a citation format, a preservation copy. Datasets got that treatment over the last fifteen years. Software — the third thing modern research runs on — mostly hasn’t. This lesson is about extending the system you already run, identifiers, metadata, preservation, and discoverability, to the one research output it has been quietly missing.
Why this framing works with researchers: they do not adopt these practices because they are virtuous. They adopt them because journals are starting to require citable code deposits, because funders ask, and because a DOI turns invisible labor into a countable, citable output for their CV. Lead with that: this is credit they are currently leaving on the table.
Who this lesson is for
You may be here for one of two reasons:
- You write research software and want to make your own code citable, reusable, and discoverable.
- You support people who do as a librarian, OSPO member, or research-support specialist who advises others on these practices.
The hands-on steps are the same either way. You will work through a real repository and add the pieces that make software FAIR. What differs is the judgment around each step. Throughout the lesson, watch for Supporting others boxes. They translate each technical step into the advising and consultation work that library and OSPO roles do, including when to refer a question rather than answer it yourself.
New to any of these terms?
Every specialized term in this lesson — bus factor, FAIR4RS, DOI, CFF, ORCID, SWHID, and more — is defined on the Reference / Glossary page. Keep it open in a tab as you work.
How common is this?
A 2021 analysis found that over 48% of research articles mention software, but consistent sharing and citation remains the exception. Most of that software is either unavailable, uncredited, or impossible to reproduce.
A GitHub URL Isn’t a Citation
Even when software runs perfectly, it usually doesn’t get credited. Most researchers “cite” code by dropping a URL into a paper:
The wrong way
“We used the analysis script from https://github.com/UC-OSPO-Network/software-demo”
Problems:
- URLs break (link rot)
- No version specified (which run of the code produced which result?)
- No formal credit; the author’s name isn’t even visible
- Cannot appear in citation metrics
A URL is a shelf location, not a catalog record. Citing code this way is like citing a book as “third shelf, Powell Library reading room.” It tells you where the thing sat on one particular day. Move the book, close the room, and the reference is dead.
This isn’t hypothetical. Forges close.
- Gitorious shut down in 2015, making thousands of projects unreachable overnight
- Google Code shut down in 2016, same result
- A username change, a repo rename, or a deleted account breaks any URL-based citation just as completely
The right way
Dennis, T. (2025). Biodiversity Analysis Toolkit (v0.1.0). Zenodo. https://doi.org/10.5281/zenodo.123456
Why this works:
- DOI is permanent; it survives username changes, repo moves, even if GitHub disappears
- Version is explicit, so someone can reproduce the exact run
- Author gets formal credit and citation metrics
The fix is a CITATION.cff file and a DOI, both of which
you’ll create in this lesson.
Software is the instrument
Nobody publishes results from a telescope without saying which telescope, which configuration, which night. Software is the instrument for computational work. “We used a script,” with no version, license, or identifier, is a methods section with the instrument blacked out.
Software Has a Durability Problem
Credit is the first problem; survival is the second. Most research code lives on one laptop, in one person’s head, under one person’s account.
The Bus Factor: the number of people who need to be “hit by a bus” before a project becomes unmaintainable. For most research code the answer is one.
Restated for collections people: how many people would have to leave before this software becomes unrecoverable? A library would never accept a collection with a bus factor of one, and that is exactly what an un-deposited, un-documented repository is. Depositing a release into an archive like Zenodo is the software equivalent of accessioning: it moves the object out of a personal account and into a preservation system that outlives the individual.
Why this matters for research
Research software that lives only on one person’s machine:
- Cannot be verified or reproduced
- Cannot be built upon by others
- Cannot receive proper academic credit
- Disappears when that person moves on
Can Anyone Actually Run It?
There is a third problem, and it is the one researchers feel first: software that runs on its author’s machine and nowhere else. With undocumented dependencies and an unstated language version, a colleague who tries to run it sees something like:
OUTPUT
$ python src/analysis.py

ModuleNotFoundError: No module named 'numpy'
For reuse to be real, someone has to be able to run the code, not just find and cite it. This is the reproducibility layer of the problem, and it is the focus of the optional environment episode at the end of the lesson. The core lesson makes software citable and discoverable; the optional episode makes it runnable.
Most librarians and support staff in the room will not have hit this exact error themselves, so don’t lean on it as a shared war story. Frame it instead as the barrier researchers describe when code “doesn’t work,” and flag that the mechanics live in the optional pixi episode, so a citation-focused workshop can acknowledge the problem and move on.
The Fix: FAIR4RS Principles
The solution is to apply FAIR Principles for Research Software (FAIR4RS):
F - Findable: Software and metadata are easy to discover → DOI, CITATION.cff, metadata
A - Accessible: Retrievable via standard protocols → Public GitHub, archived on Zenodo
I - Interoperable: Uses standard metadata formats and documented dependencies so people and tools can interpret the software → Standard formats, documented dependencies
R - Reusable: Can be executed AND modified → LICENSE, README, environment files
Treat this as a preview, not a lecture. Learners will understand Findable, Accessible, Interoperable, and Reusable much better after they create the license, citation metadata, DOI, and README metadata. Name the four principles, point ahead to where each gets built, and move on.
What You’re Doing TODAY
In this workshop, you will turn a bare research repository into a citable, discoverable software project by adding:
- ✅ License — so others can legally reuse your work
- ✅ Citation (CITATION.cff + DOI) — so you get academic credit
- ✅ README & metadata — so people can find and understand it
- ✅ Environment (optional) — so it also runs on any machine
What “Done Right” Looks Like
The “Before” State (main)
Open your fork of the demo repository. Its main branch
is the starting state:
- ❌ No LICENSE
- ❌ No citation information
- ❌ No DOI
- ❌ Minimal README
- ❌ No community or metadata files
The “After” State (after-metadata)
In the branch dropdown, switch to the after-metadata
reference branch to see the finished repository:
- ✅ LICENSE (BSD-3-Clause)
- ✅ CITATION.cff (citation metadata)
- ✅ README.md (complete documentation)
- ✅ CONTRIBUTING.md (contribution guidelines)
- ✅ CODE_OF_CONDUCT.md (community standards)
- ✅ .zenodo.json (Zenodo metadata)
- ✅ DOI badge in README
A documented, reproducible environment is the one
FAIR piece not shown here. It’s covered in the optional pixi episode and
lives on the optional-pixi
branch.
This is what makes software Findable, Accessible, Interoperable, and Reusable.
Real-World Example: Spack
Want to see a production research software project that follows these principles?
Spack is used by national labs, universities, and supercomputing centers: https://github.com/spack/spack
Check their repository and notice:
- ✅ README with clear description and getting started guide
- ✅ LICENSE (MIT and Apache-2.0)
- ✅ CITATION.cff file
- ✅ Documentation
- ✅ Code of conduct and Contributing guide
Challenge: Who Gets Credit?
You created a Python script used to generate results in a collaborative paper. The paper cites the dataset but not the script. What’s missing, and what would a proper software citation look like?
The script should be citable as a distinct research output. Without citation metadata or a DOI, the software contribution goes unrecognized and nobody can find or reproduce the exact version used.
A proper citation would include: author(s), software title, version,
repository or archive URL, and a persistent identifier (DOI). A
CITATION.cff file in the repository provides all of this
automatically.
Challenge 2: Reflect on a Repository
Think about a repository you’ve written, inherited, or been asked about:
- If someone wanted to cite it in a paper, how would they do it today?
- If the author moved to a new institution, could you still find and access it?
- Could someone else run it on their machine? What would they need?
Share one challenge you’ve seen with software citation, sharing, or reuse.
Common gaps include:
- No citation information available (no CITATION.cff, no DOI)
- Missing LICENSE file (so others legally can’t reuse it)
- The only copy lives in one personal account
- No documentation of dependencies or versions
All of these will be addressed in this lesson.
What We’ll Build Together
Starting from the bare main state in your fork, you’ll
progressively add each component:
- Episode 1: Sharing research software (exploring the starting repository)
- Episode 2: Adding an open-source license
- Episode 3: Creating a CITATION.cff file
- Episode 4: Minting a DOI and creating releases
- Episode 5: Improving metadata and discoverability
- Episode 6: Managing environments with pixi (optional, requires a local install)
- Episode 7: Wrap-up and reflection
Each episode adds one piece to your fork’s main branch.
View-only reference branches (after-license,
after-citation,
after-release,
after-metadata)
let you check your work at any point.
What’s hands-on vs. what’s a tour. The core,
do-it-yourself path is short: add a LICENSE, add a CITATION.cff,
create a release with a Zenodo DOI, and improve the README and
topics. Other things you’ll meet along the way, such as
Software Heritage, .zenodo.json,
CONTRIBUTING.md and CODE_OF_CONDUCT.md, and
the optional pixi environment episode, are worth knowing about but are
extensions: read or watch them, and add them later when a project needs
them.
- Software is a research output the scholarly system has mostly failed to catch: uncredited, hard to find, and easily lost
- A GitHub URL is not a citation: URLs rot, pin no version, and give no formal credit, while a DOI is permanent and version-specific
- Undeposited software has a “bus factor” problem, and forges do shut down, so durability requires archiving
- FAIR4RS principles (Findable, Accessible, Interoperable, Reusable) provide the framework
- Making software citable and discoverable centers on a LICENSE, a CITATION.cff file, a release with a DOI, and rich metadata
- Reproducible environments (“works on my machine”) are the optional final layer
- You build up your own fork step by step; view-only reference branches show the target state at each stage
Content from Sharing Research Software Effectively
Last updated on 2026-07-07 | Edit this page
Estimated time: 22 minutes
Overview
Questions
- Why share research software in a public repository?
- What are the minimum elements that make a repository useful and discoverable?
Objectives
- Describe why public repositories increase visibility and credit for research software.
- Identify the essential components of a well-structured repository.
- Recognize the “before” state of the demo repository used throughout the lesson.
- Supporting others: triage an unfamiliar repository and name its single highest-value next step.
Present, but not yet usable
Every archivist knows the unprocessed accession: boxes that made it into the building but not into the collection, technically held, practically invisible. Most research software on GitHub is in exactly that state. It is public, which is not the same as shared. No license, no citation information, no description a stranger could act on. An open repository with none of those is like leaving the reading room unlocked and calling it access: people can technically get in, and nothing helps them once they do.
Publishing in a public repository is still the right first step. It is what makes finding, understanding, reusing, and citing your work possible, and it is where visibility and formal credit begin. This episode is the collection assessment: look at a bare repository the way you would look at a new accession, and learn to name the one addition that would move it from “present” to “usable.”
In this lesson, we start with a minimal example repository (your
fork’s main branch, the starting state). As you progress
through the episodes, you will progressively refine it until it is
citable, discoverable, and ready for reuse.
Why this episode matters to researchers: reviewers now ask “where is the code,” and a bare repo is a worse answer than it looks, because it invites follow-up questions it cannot answer. The four-question triage below is also your own take-home tool; it is the five-minute consultation format the whole lesson builds toward.
Teach from your own fork of the demo repository, exactly as learners do, so everyone is looking at the same starting state. See the Instructor Notes for the one-time fork setup. During the lesson you demonstrate each step live in your fork’s web interface and learners mirror it in theirs.
To show the “before and after” contrast, use the branch dropdown in the browser:
-
Before — the
mainbranch: a sparse, hard-to-reuse project -
After — the
after-metadatabranch: a clear, licensed, citable, well-documented project
Use progressive disclosure: show only the top-level
file listing first, then open individual files as you discuss them. No
terminal or git checkout is needed; the reference branches
are there to view and compare against, not to build on.
The Starting Point
Before you begin: fork the demo repository
Every hands-on step happens in your own fork, not the shared demo repo.
- Open https://github.com/UC-OSPO-Network/software-demo.
- Click Fork, then Create fork (the
defaults are fine; you only need the
mainbranch). - Confirm the top-left of the page now reads
YOUR-USERNAME/software-demo, notUC-OSPO-Network/software-demo. That is where you will make every change.
Use the after-* reference branches only to check your
work, never to build on. Full setup details are on the Setup page.
If you are here as a researcher rather than to support others: treat the demo fork as a practice run. The same steps and checklist transfer directly to your own repository.
Before learners begin, ask everyone to confirm the top-left
repository path says THEIR-USERNAME/software-demo, not
UC-OSPO-Network/software-demo. Have helpers check
Zoom/chat/room for anyone still on the upstream repository. Do not
continue until most learners are in their own fork.
Open your fork and look at the “before” state on the
main branch:
Ask learners to confirm they can see exactly README.md,
requirements.txt, and src/analysis.py in their
fork. This is the best early moment to catch learners who are on the
wrong repository, wrong branch, or not signed in.
This repository intentionally lacks many elements of good
research software practice.
By the end of the lesson, it will include licensing, citation metadata,
improved discoverability information, and versioning.
Supporting others
Scanning a repository the way we just did is itself a core consultation skill. When a researcher brings you their repo, you are doing a fast triage, not a full code review, any more than a reference interview is a dissertation defense. A useful first pass asks four questions in order:
- Rights: is there a license? Can this legally be reused at all?
- Credit: can a stranger tell who made it and how to cite it?
- Runnable: is there any record of what it takes to run (dependencies, environment)?
- Findable: would anyone outside the lab ever discover it?
The goal is to name the single highest-value next step, not to fix everything. Most repos need one or two changes to go from unusable to useful, and your value is helping the researcher see which one. That ordering is the whole skill, and it is one this audience already has from appraising every other kind of material.
Challenge 1: What Makes a Repository Reusable?
Could you think about the last time you tried to use someone else’s code?
If you have a public GitHub repository, open it now. If not, visit a repository from your field that you’ve used or seen cited.
Check for these elements:
Which of these elements help most? Which would you add to your own work first?
Useful elements commonly include:
- README with context and usage
- a clear file structure
- license information
- installation instructions
- dependencies or environment files
- contributors or authorship information
Missing pieces often include absent documentation, unclear purpose, or no license.
Learn More About Effective READMEs
Want to dive deeper into README best practices?
- Elegant READMEs - practical guide on writing clear, maintainable documentation
- Awesome README - curated examples from real projects
Full references available on the Reference page.
Challenge 2: Inventory the Demo Repository
Open your fork of the software-demo repository on GitHub.
Spend 2 minutes exploring, then answer:
- Could you run this code today? What’s missing?
- Would you know who created it or how to credit them?
- Could you legally reuse or modify it?
We’ll address these gaps together over the next episodes.
Learners may observe:
- README is minimal
- No license
- No citation file
- No metadata to support discoverability
- Environment file exists but is not yet introduced
These gaps will be filled across subsequent episodes.
- Public repositories increase findability, reuse potential, and
citation credit.
- A well-structured repository lowers the barrier for others to
understand your work.
- The lesson begins with a minimal “before” repository that will be incrementally improved.
Content from Choosing an Open-Source License
Last updated on 2026-07-09 | Edit this page
Estimated time: 30 minutes
Overview
Questions
- Why do you need a license for your code?
- How can an open-source license increase reuse and citation?
- What licenses does the UC system recommend?
Objectives
- Explain why unlicensed software is not legally reusable
- Describe the main categories of open-source licenses
- Choose an appropriate license for a UC research project, using UC resources
- Add a license file to a GitHub repository
- Supporting others: decide when a licensing question is yours to answer and when to refer it to Tech Transfer / IP
Why licensing matters
Here is the counterintuitive fact this episode turns on: code posted publicly on GitHub with no license is not open. Copyright attaches automatically, so “no license” means “all rights reserved,” and anyone who reuses that code is technically infringing. The visible repo is an invitation nobody can legally accept. A license file is one small text file, usually chosen from a short approved list, and it is the difference between “look but don’t touch” and actually reusable.
Clear licensing tells others what they can and cannot do with your code, which is the minimum needed for open, reproducible research. The UC OSPO License Guide covers UC institutional requirements.
Why this episode matters to researchers: licensing is where reuse and credit actually begin. An unlicensed repo cannot be legally built on, which means it will not accumulate the users, forks, and citations that make software count as a scholarly contribution. This is also the one episode with a hard referral boundary: you can explain categories and point to the campus default, but ownership questions go to Tech Transfer. Knowing where that line sits is itself the expertise.
Institutional Context: Who Owns Your Software?
At most universities, software created using institutional resources is owned by the institution, not the individual researcher. Before releasing code under an open-source license, check with your Technology Transfer or Intellectual Property office. They will verify ownership, funding requirements, and any third-party restrictions.
If you are at a UC campus: software is typically owned by The Regents of the University of California. Your campus Tech Transfer office can help you select from the UC-approved license list. (UC-specific)
At other institutions: check with your research computing, library, or legal office. Most will have a similar process and a list of preferred licenses.
Understanding license categories
Learners often fear a wall of legal text here, but the real decision is usually binary. Open-source licenses fall into two broad groups, and for most research code the whole choice takes less time than choosing a journal.
Permissive licenses
Examples: BSD, MIT, Apache 2.0
These allow broad reuse with minimal restrictions. Anyone can copy, modify, or redistribute the code. They are common in research because they’re simple and maximize flexibility. Think of them as roughly a CC BY for code: “reuse this, just keep my name on it.”
BSD licenses are a common first choice at many research institutions because they:
- originated at UC Berkeley
- are simple to understand
- protect both the institution and authors
- integrate well with most other licenses
- have minimal restrictions
Copyleft licenses
Example: GPL 2.0
These require that derivative works also remain open-source. This protects openness across the lifecycle of a project. They add one condition to the permissive deal: “and anything you build from it must stay open too.”
Note on GPL 3.0
The UC system does not recommend GPL 3.0 for university-owned software due to patent provisions that may conflict with UC policies. If you need copyleft protection, consult your campus Tech Transfer office about GPL 2.0 or alternatives.
How to choose a license
The decision guide below and the license references in this episode center UC policy and the UC OSPO guidance. For a non-UC workshop, swap in your own institution’s license guidance and name the local office that answers ownership questions (usually a technology transfer or research office) in place of the UC pointers.
Timebox the license discussion. The teaching target is not license philosophy; it is recognizing no-license risk, choosing a low-risk default for the demo, and knowing when to refer ownership or policy questions to Tech Transfer or the local equivalent. If the room starts debating MIT vs BSD, name the campus default and move on.
Five “low-risk” licenses are suitable for most research projects. Here’s a decision guide:
graph TD
    accTitle: License decision flowchart
    accDescr {
        Decision tree for choosing an open source license, starting from whether the project has special requirements, branching to BSD 3-Clause, MIT, Apache 2.0, ECL 2.0, or GPL depending on the need, and ending with a check with the campus Tech Transfer Office.
    }
    Start[Starting a new UC research software project?] --> Check{Do you have<br/>special requirements?}

    Check -->|No special needs| BSD[Use BSD 3-Clause<br/>✓ Common research default<br/>✓ Simple and protective<br/>✓ Widely compatible]

    Check -->|Need simpler text| MIT[Use MIT License<br/>✓ Nearly identical to BSD<br/>✓ Shorter, easier to read<br/>✓ Very popular]

    Check -->|Industry partnership<br/>or patent concerns| Apache[Use Apache 2.0<br/>✓ Explicit patent protection<br/>✓ Detailed contribution terms<br/>✓ Industry-friendly]

    Check -->|Educational focus| ECL[Consider ECL 2.0<br/>✓ Education-specific variant<br/>✓ Based on Apache 2.0]

    BSD --> TTO[Verify with campus<br/>Tech Transfer Office]
    MIT --> TTO
    Apache --> TTO
    ECL --> TTO

    Check -->|Need copyleft| Copyleft{GPL version?}
    Copyleft -->|GPL 2.0| GPL2[May be acceptable<br/>Consult Tech Transfer]
    Copyleft -->|GPL 3.0| GPL3[❌ Not recommended by UC<br/>Patent conflicts]

    GPL2 --> TTO
    GPL3 --> TTO

    style Start fill:#f5f5f5,stroke:#333,color:#000
    style Check fill:#f5f5f5,stroke:#333,color:#000
    style Copyleft fill:#f5f5f5,stroke:#333,color:#000
    style BSD fill:#90EE90,stroke:#333,color:#000
    style MIT fill:#90EE90,stroke:#333,color:#000
    style Apache fill:#90EE90,stroke:#333,color:#000
    style ECL fill:#90EE90,stroke:#333,color:#000
    style GPL2 fill:#FFFF99,stroke:#333,color:#000
    style GPL3 fill:#FFB6C6,stroke:#333,color:#000
    style TTO fill:#87CEEB,stroke:#333,color:#000
Quick reference
| Your need | Recommended license | SPDX identifier | Why |
|---|---|---|---|
| Default / most projects | BSD 3-Clause | BSD-3-Clause |
Common default at research institutions |
| Simplest possible | MIT | MIT |
Minimal text, very popular |
| Industry collaboration | Apache 2.0 | Apache-2.0 |
Explicit patent terms |
| Educational focus | ECL 2.0 | ECL-2.0 |
Education-specific variant |
The SPDX identifier is the short, machine-readable
code used by GitHub, Zenodo, and your CITATION.cff file to
communicate your license automatically. When GitHub shows a license
badge in the sidebar, it’s reading the SPDX identifier.
Always consult your institution’s Tech Transfer or IP office before releasing software created with institutional resources.
Software licenses (BSD, MIT, Apache) are written for executable code. If your repository also contains datasets, figures, or documentation, those files need a separate license.
The standard choice for research outputs is Creative Commons Attribution 4.0 (CC BY 4.0), which allows broad reuse with attribution.
A common pattern:
-
/srcor your code files →BSD-3-ClauseorMIT -
/dataor/docs→CC-BY-4.0
You can note this split in your README and in
CITATION.cff under the license field, which
accepts a list:
Most research repositories don’t need this, but if you’re sharing a dataset alongside code, it’s worth thinking through.
Resources
- ChooseALicense.com – Compare features across all common licenses.
- SPDX License List – Authoritative registry of license identifiers used in CITATION.cff and package metadata.
- UC OSPO License Guide (UC-specific) – UC institutional requirements and templates.
- UC OSS Chart and Companion Guide (UC-specific) – UC-approved “low-risk” license list.
Supporting others
Licensing is the step where advising and deciding must stay
separate. You can explain the categories, point to the campus default,
and walk someone through adding a LICENSE file. You are not
the office that determines who owns the code.
Refer rather than answer when:
- Ownership is unclear (institutional resources, grant funding, multiple institutions, industry partners). This goes to Tech Transfer / IP, not the service desk.
- The repo pulls in third-party code or data with its own license terms that might conflict.
- Someone wants to relicense or remove a license on code that already has contributors.
What you can own confidently: knowing your campus default (BSD-3-Clause at UC), knowing the approved-license list exists, and making sure the ownership question gets asked before code goes public. The most useful thing you do here is often a warm handoff, not a recommendation.
When the filename is LICENSE, GitHub should offer a
license template chooser (“Choose a license template”). If learners do
not see it, check the filename, that they are creating the file in the
repository root, and a browser refresh before troubleshooting anything
more complex.
Challenge: Add a BSD License to Your Repository
We will add the BSD 3-Clause license to your demo repository:
- Navigate to your repository on GitHub.
- Click Add file → Create new file.
- Name it exactly
LICENSE(no file extension). - Click Choose a license template and select BSD 3-Clause License.
- Update the copyright holder to reflect who owns the software. At UC
campuses this is
The Regents of the University of California; at other institutions check with your Tech Transfer office. (If this is a personal project, use your own name.) - Update the year to 2026.
- Commit the file to your
mainbranch.
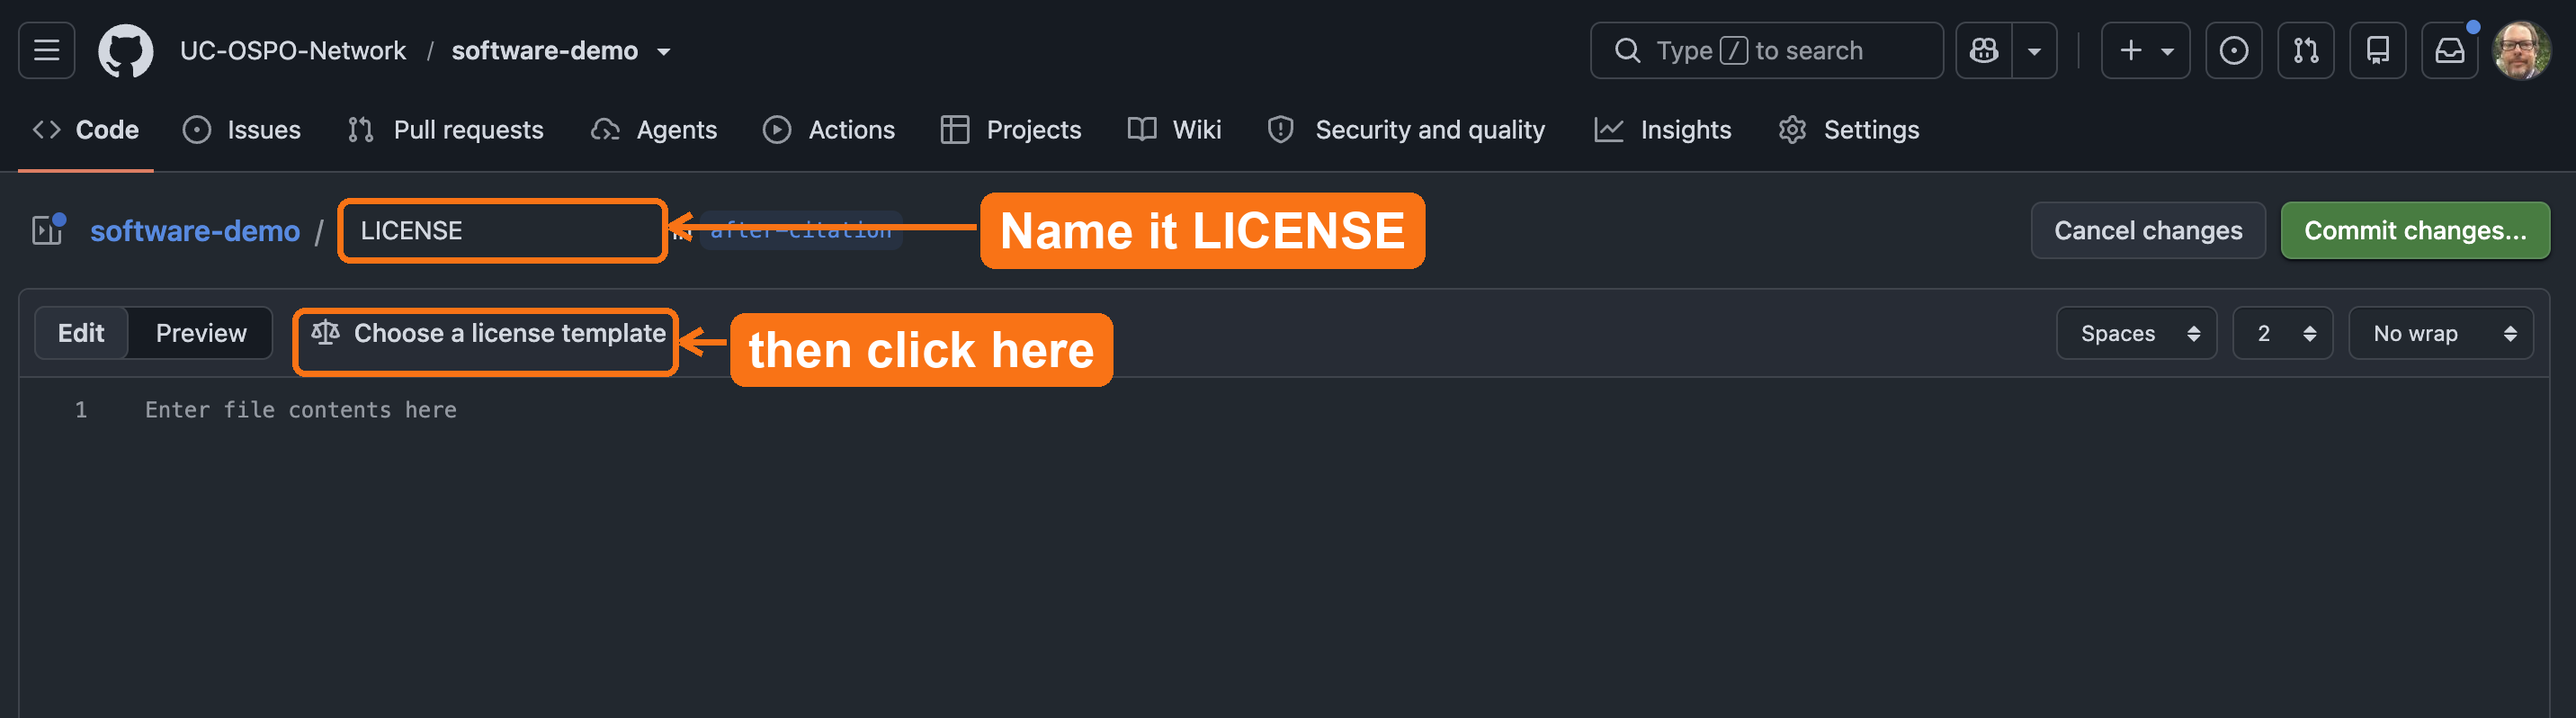
LICENSE, then
click Choose a license template to insert the full BSD
3-Clause text.Verify: Does your repository now display the “BSD-3-Clause” license badge in the sidebar?
GitHub automatically detects the LICENSE file and
displays it in the sidebar. Your file should look like this:
BSD 3-Clause License

Copyright (c) 2026, The Regents of the University of California
All rights reserved.
If the badge doesn’t appear, ensure the file is in the root directory
and named exactly LICENSE.
Check your work
Compare your fork against the after-license
reference branch on the demo
repository. It shows the target state after this episode: a
LICENSE file in the root and the BSD-3-Clause badge in the
sidebar.
Communicating your license
After adding a LICENSE file, reference it in your README so users immediately understand usage terms.
Add this section near the top of your README:
MARKDOWN
## License

This project is licensed under the BSD 3-Clause License - see the [LICENSE](LICENSE) file for details.
Why this matters: Users reading your README on platforms other than GitHub (Zenodo, email, exported PDFs) will see your license terms even without GitHub’s automatic detection.
Exercise: License Scenarios
Which license would you recommend for each UC research scenario?
Scenario 1: A Python package for ecological data analysis. You want maximum adoption across academia and industry.
Scenario 2: A data visualization tool developed with a biotech partner who may commercialize derivatives.
Scenario 3: A simple utility script you’re sharing with collaborators.
Scenario 1: BSD 3-Clause (UC’s default recommendation, maximum flexibility and adoption)
Scenario 2: Apache 2.0 (explicit patent protection important for industry partnerships)
Scenario 3: Either BSD 3-Clause or MIT (both work well for simple sharing; BSD preferred by UC)
In all cases, verify with your campus Tech Transfer office before releasing.
Summary
Licensing is foundational to making research software usable, citable, and shareable. In this episode, you added a BSD license to a repository following UC recommendations.
- Without a license, software is legally restricted and not reusable
- BSD 3-Clause is a common default at research institutions; MIT and Apache 2.0 are strong alternatives
- Permissive licenses (BSD, MIT, Apache 2.0) maximize flexibility and adoption
- Always consult your institution’s Tech Transfer or IP office before releasing institutionally-owned software
- GitHub makes adding standard licenses straightforward
Content from Adding a CITATION.cff File
Last updated on 2026-07-07 | Edit this page
Estimated time: 30 minutes
Overview
Questions
- What is a CITATION.cff file and why does it matter?
- How does GitHub use CITATION.cff to generate ready-made citations?
- What minimal metadata should researchers include?
Objectives
- Explain the role of CITATION.cff in software citation.
- Create and customize a CITATION.cff file in a GitHub repository.
- Describe how the file connects to later steps like releases and DOIs.
- Supporting others: coach a researcher through a CITATION.cff and recognize when authorship is a referral, not a metadata fix.
A catalog record for your software
When someone wants to cite a book, nobody emails the author to ask how. The catalog record answers it. Software has lacked that record, so people improvise: they cite a URL, or the paper the code appeared in, or nothing. A CITATION.cff file is the catalog record for a repository, a short structured-metadata file that says exactly who to credit and how. Once it exists, GitHub grows a “Cite this repository” button, and the guesswork ends.
Every librarian has shown a student the “Cite” button on a database record and watched the relief. This is the same button, on code, and the researcher controls what it says. Without the file, everyone who wants to cite the software writes their own version of the reference, and the credit scatters across formats no index can reconcile.
A CITATION.cff file is the simplest, most direct way to make your software citable. It provides structured citation metadata that:
- tells others how to reference your work
- allows GitHub to display a “Cite this repository”
button
- supports good scholarly practice and FAIR4RS principles
You can create this file before releases or
DOIs.
If you later add a DOI or version tag, you can update the file at any
time.
Show learners what the citation panel looks like on a GitHub
repository that already has a CITATION.cff file. This gives
them a clear target and reduces cognitive load.
Reassure learners that a tiny file is fine. They can refine it later as their software matures.
Why this episode matters to researchers: this is the single highest-return step in the lesson. One small file, committed once, and every future citation of the software is correct, complete, and countable. It is also the step where a scholcomm professional can sit beside a researcher as the expert, because the hard part is metadata judgment, not code.
What belongs in a CITATION.cff file?
A minimal file includes:
-
title of the software
-
authors (ORCID recommended if available)
-
version (optional at this stage)
- message with basic instructions
As your project grows, you can add:
- release versions
- DOIs from Zenodo or another service
- keywords
- abstract
- repository URLs
Learners do not need to know the entire schema.
The point is to start small and publish useful metadata early.
Why the CFF format works well
- human-readable
- YAML-based
- validated automatically by GitHub
- supported by tools including Zotero, Zenodo, and reference managers
If you have ever edited a repository record, filled in a Dublin Core field, or touched frontmatter on a library website, you have done harder metadata work than this. The format is new to researchers; the thinking is native to library work. And the file compounds downstream: Zenodo reads it, Zotero reads it, and the citation travels with every clone and fork of the code, which a citation buried in a paper’s methods section never does.
How to Create a CITATION.cff File
You will do this entirely in GitHub’s web interface, in your fork. No
terminal required. GitHub has this built in: name a new file
CITATION.cff and it hands you a starter template to
edit.
Learners may try to perfect authorship, contributor roles, or author order. For the demo, use the provided values and keep moving. For real projects, authorship order is a PI/team decision; the consultant can explain the fields and options but should not decide credit. If someone asks “who counts as an author?”, flag it as a team conversation, not a metadata fix.
Create the file on GitHub
In your fork of software-demo:
- Click Add file → Create new file.
- Name the file exactly
CITATION.cff(it must live in the repository root, and the name is case-sensitive). As soon as you do, GitHub recognizes it and shows a banner with an Insert example button. - Click Insert example. GitHub drops a valid, ready-to-edit template into the editor.
- Edit the placeholders: replace
YOUR_NAME_HERE, add real ORCIDs, and set thetitleandurlto match your repository. -
Delete the
doiline (you do not have a DOI yet, you will add it in the next episode). Deleteversionanddate-releasedtoo if you have not made a release; otherwise set them to match. - Click Commit changes… and commit to your
mainbranch.

CITATION.cff, click
Insert example to drop in GitHub’s template, edit the
placeholder names and ORCIDs, then commit to main.The inserted template looks like this before you edit it:
YAML
cff-version: 1.2.0
message: "If you use this software, please cite it as below."
authors:
  - family-names: "YOUR_NAME_HERE"
    given-names: "YOUR_NAME_HERE"
    orcid: "https://orcid.org/0000-0000-0000-0000"
title: "your-repository-name"
version: 1.0.0
doi: 10.5281/zenodo.1234
date-released: 2026-07-05
url: "https://github.com/YOUR-USERNAME/your-repository-name"If more than a few learners hit YAML indentation errors, switch the whole room to cffinit rather than debugging individual whitespace mistakes. The goal is citation metadata, not YAML mastery. cffinit validates as they type and produces a file they can paste.
Prefer a guided form? Use cffinit
cffinit
is a web wizard that walks you field by field and validates as you type.
It is worth using when your metadata is more involved: many authors, a
preferred-citation for an associated paper, keywords, or a
license you want recorded precisely. Fill out the form, copy the
generated file, and paste it into the same CITATION.cff you
create on GitHub. More on the format: https://citation-file-format.github.io/.
A finished file looks like this:
YAML
cff-version: 1.2.0
title: "Biodiversity Analysis Toolkit"
message: "If you use this software, please cite it as below."
authors:
  - family-names: "Dennis"
    given-names: "Tim"
    orcid: "https://orcid.org/0000-0001-6632-3812"
  - family-names: "Phan"
    given-names: "Leigh"
    orcid: "https://orcid.org/0000-0002-8605-1444"
  - family-names: "Otsuji"
    given-names: "Reid"
    orcid: "https://orcid.org/0000-0002-1842-0295"
  - family-names: "Padilla"
    given-names: "Karla"
version: "0.1.0"
date-released: 2026-02-01
url: "https://github.com/UC-OSPO-Network/software-demo"
repository-code: "https://github.com/UC-OSPO-Network/software-demo"
There is deliberately no doi field yet:
you do not have one until you mint it in the next episode. Once you
create a release and Zenodo assigns a DOI, you will come back and add a
doi: line. If your project has no tagged version either,
you can omit version and date-released for now
and add them at release time.
Once you commit it to the default branch, GitHub adds a “Cite this repository” button automatically.
If your software does not yet have version tags, you may omit the
version field until Episode 4 when you create releases.
Check your work
Compare your fork against the after-citation
reference branch on the demo
repository. It shows the target state after this episode: a
CITATION.cff in the root and a “Cite this repository”
button in the sidebar.
Linking to a published paper
Many researchers want users to cite a journal article
alongside or instead of the raw software repository.
The preferred-citation field handles this: it tells GitHub,
Zotero, and other tools which reference to show first.
YAML
cff-version: 1.2.0
message: "If you use this software, please cite the paper below."
authors:
  - family-names: "Dennis"
    given-names: "Tim"
    orcid: "https://orcid.org/0000-0002-1234-5678"
title: "Biodiversity Analysis Toolkit"
version: 0.1.0
date-released: 2025-01-15
url: "https://github.com/UC-OSPO-Network/software-demo"
preferred-citation:
  type: article
  title: "Biodiversity Analysis at Scale: Methods and Software"
  authors:
    - family-names: "Dennis"
      given-names: "Tim"
  journal: "Journal of Open Source Software"
  year: 2025
  doi: "10.21105/joss.00000"
Without preferred-citation, GitHub shows the software
repository citation by default. Adding it ensures that anyone clicking
“Cite this repository” gets your paper’s citation instead, which is
usually what you want for impact tracking.
No paper yet? Skip it.
Leave out preferred-citation if you don’t have a
published article. You can add it later. The rest of the file works fine
without it.
Challenge
Before learners refresh GitHub after committing
CITATION.cff, ask them to predict what GitHub will add.
Then reveal the “Cite this repository” panel. This keeps GitHub’s helper
behavior visible as a platform pattern rather than a surprise, and sets
up the “GitHub recognizes certain filenames” idea later.
Predict: what will GitHub do?
You’ve created CITATION.cff and you’re about to commit
it to the default branch. Before you do, predict: what changes on the
repository’s GitHub page?
GitHub parses the file and adds a “Cite this repository” button to the sidebar, offering ready-made citations (APA, BibTeX, and more) generated from your metadata. No DOI is required for this to appear.
Step 3: Commit and refresh
After you commit the file, GitHub:
- parses and validates it
- displays a “Cite this repository” panel
- provides download options (BibTeX, EndNote, CFF, APA)
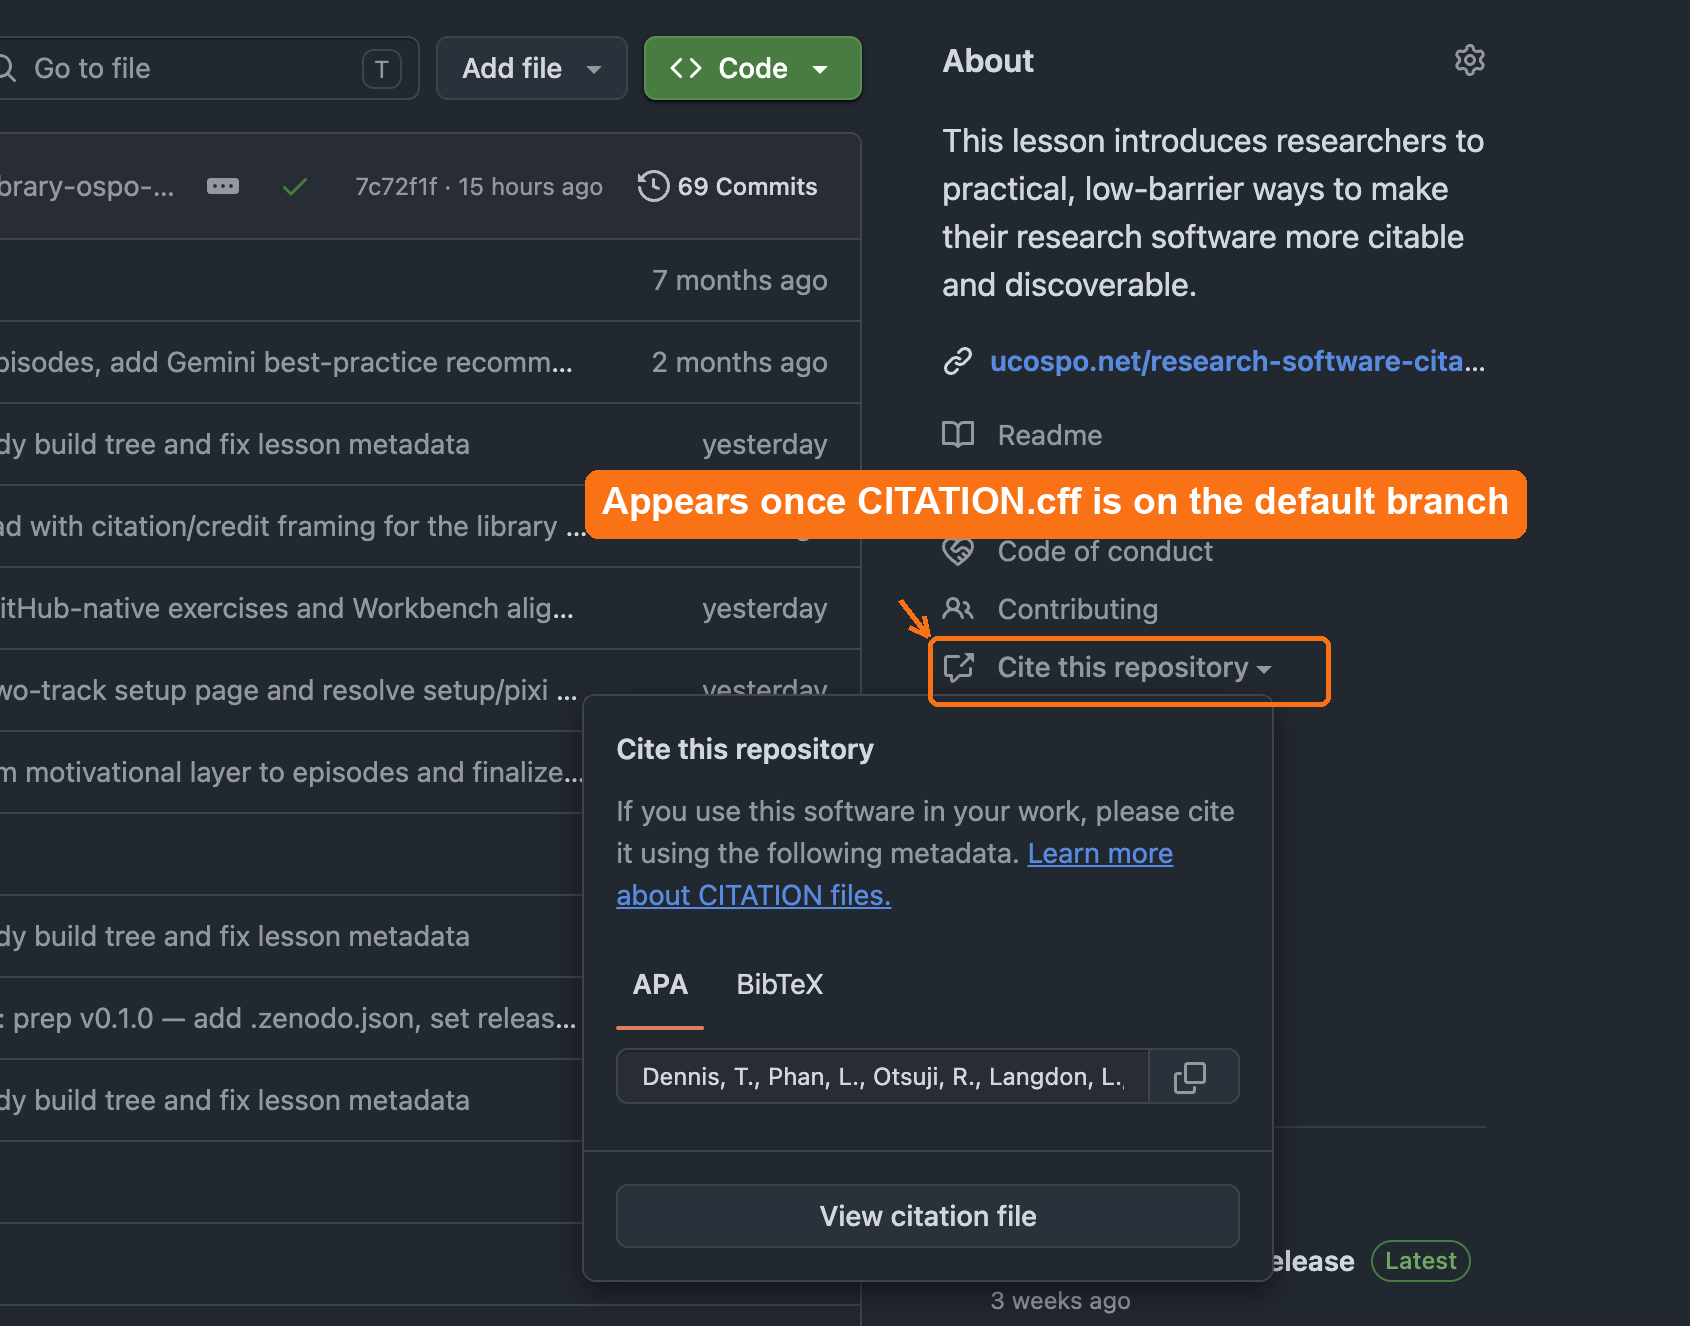
CITATION.cff is on the default
branch, GitHub adds a Cite this repository link to the
About sidebar that opens ready-made APA and BibTeX citations.This feature works even without a DOI.
Text-only check: after you commit
CITATION.cff, refresh the repository page. The About
sidebar should now show a “Cite this repository”
link.
Check, in order:
-
Filename and location — is it named exactly
CITATION.cff(case-sensitive) and in the repository root, not a subfolder? - Branch — is it committed to the default branch? GitHub only reads the file from the default branch.
- Valid YAML — does the file parse? A stray indentation or missing quote stops GitHub from rendering the panel. cffinit validates for you.
This three-question triage is exactly the kind of quick diagnostic you will run in a consultation.
Supporting others
In a consultation you rarely edit a researcher’s files yourself. Your job is to make the workflow easy for them to own:
- Point them to cffinit (https://citation-file-format.github.io/cffinit/) instead of hand-editing YAML. It validates as they go and prevents most formatting errors.
- Show the payoff first: the “Cite this repository” panel on a repo that already has the file. People adopt what they can see.
- Know the boundary. If authorship or author order is contested, that is a credit negotiation between collaborators, not a metadata fix. Surface it, don’t arbitrate it.
Exercise 1: Identify missing metadata
Look at your repository (or the example repository provided with the lesson).
Reflect:
- What metadata is easy to add today?
- What might require input from collaborators?
- What do you prefer to add later?
Share one observation.
Typical missing pieces include:
- ORCID IDs
- complete contributor list
- description or abstract
- license information
- DOI (added later if desired)
Exercise 2: Add a CITATION.cff file
Steps:
- Create CITATION.cff.
- Add at least: title, author(s), and message.
- Commit and refresh to see GitHub’s citation panel.
Challenge: Is a citation file enough?
You now have a CITATION.cff and GitHub’s “Cite this
repository” button. That is a real and necessary first step: anyone can
cite the software in a consistent form, and the metadata is
machine-readable. But before the next episode, think about what this
citation still does not guarantee. Consider three
questions:
- If someone cites your repository today and you change the code tomorrow, does their citation still point to the code they actually used?
- If the repository is renamed, the account is deleted, or GitHub itself goes away, does the citation still resolve to anything?
- Can a reader retrieve the exact version of the software that produced a specific paper’s results?
What is missing, and what would fix it?
A CITATION.cff makes software citable in
principle, but the citation is not yet durable or
version-specific:
- It points at a moving target, the default branch, so the code being “cited” keeps changing.
- It depends on the repository staying at that URL. A GitHub URL is not a persistent identifier; it rots.
- It does not pin the exact snapshot behind a published result, so a reader cannot reliably reproduce or verify what was used.
The fix is a tagged release archived to a repository like
Zenodo, which mints a DOI: a persistent
identifier for an immutable snapshot. The DOI is what connects
the software into the scholarly credit and indexing apparatus (DataCite,
ORCID, library catalogs) and lets a citation resolve to one exact
version, permanently. Put another way: CITATION.cff says
how to cite the software; a release and DOI give the citation
something durable to point at. That is the next episode.
- A CITATION.cff file is the foundation of software citation.
- It can be added before releases, DOIs, or version tags.
- GitHub displays machine-readable citations automatically when this file is present.
- Start simple and expand over time as your project develops.
- A citation file is necessary but not sufficient: a release and DOI make the citation durable and tied to an exact version. That is the next step.
Content from Making Your Software Citable
Last updated on 2026-07-07 | Edit this page
Estimated time: 35 minutes
Overview
Questions
- What makes software citable?
- How do releases and DOIs strengthen software citation?
- How do I create a release and, optionally, mint a DOI?
Objectives
- Describe why software citation matters in research.
- Create a versioned release in GitHub.
- Explain when and why to mint a DOI with Zenodo.
- Supporting others: advise which DOI, version or concept, belongs in a given citation.
Why a repository is not an archive
A GitHub repository is a workshop, not an archive. The code changes daily, the URL can break, and “the version we used” means nothing without a marker. This episode adds the two things scholarly infrastructure needs to take software seriously: a release, which freezes a named version, and a Zenodo DOI, which gives that frozen version a persistent identifier and a preservation copy outside GitHub entirely. After this step, the software can be cited the way an article is cited, and the citation still resolves in twenty years.
Software is a research product.
Like articles and datasets, it should be cited so
others can acknowledge your work, find the exact version you used, and
understand how your software contributed to their results.
Your software becomes citable as soon as it includes:
-
Structured citation metadata, such as a
CITATION.cfffile.
-
A public location where the code is
available.
- A stable version someone can reference.
A DOI is optional but valuable. It strengthens citability by giving each version a persistent identifier.
So far in this lesson, you have:
- shared a public repository
- added a license
- added a
CITATION.cfffile
In this episode, you will create a GitHub release and learn how DOIs fit into software citation workflows.
Some learners may feel anxious about creating a DOI.
Reassure them that:
- a DOI is not required for citability
- Zenodo is free and widely used
- they can watch the demo and complete the steps later
Why this episode matters to researchers: this is where journal and funder requirements actually bite. “The journal wants a citable code deposit” means, concretely, a tagged release with a DOI, and after this episode you can say that sentence and demonstrate the twenty-minute path to compliance. The DOI is also the moment their software starts accruing countable citations, the currency their review committees already understand.
What Makes Software Citable?
Software is citable when:
- it includes authorship and version information
- the referenced version is stable
- others can access the code
A DOI enhances these qualities, but does not define them.
Why add a DOI?
A DOI is helpful for:
- increasing visibility and discoverability
- long-term persistence
- citing exact versions
- meeting journal and funder expectations
But the core citability comes from your metadata and release process.
A useful way to hold the difference: a DOI is a permanent address, a URL is a sticky note. The GitHub URL points at wherever the code happens to live today. Rename the repo, change the username, or watch the platform fold (Gitorious did, Google Code did) and the note falls off. The DOI is registered infrastructure, the same DataCite plumbing behind dataset DOIs, and it resolves no matter where the object moves.
Create a Release in GitHub
A release captures a specific version of your software.
It is the snapshot that others can cite.
Steps
- Open your GitHub repository.
- Select Releases → Draft a new release.
- Create a tag such as
v0.1.0.
- Add release notes summarizing changes.
- Publish the release.
Creating a release does not change your CITATION.cff
file. GitHub builds the “Cite this repository” panel from the file on
your default branch. After you publish a release, update the
version and date-released fields in
CITATION.cff if you want the citation to point at that
specific release.
Semantic Versioning (SemVer)
You might wonder why we chose v0.1.0. This follows
Semantic Versioning
(MAJOR.MINOR.PATCH):
-
MAJOR version when you make incompatible API
changes (e.g.,
1.0.0) -
MINOR version when you add functionality in a
backward compatible manner (e.g.,
0.1.0->0.2.0) -
PATCH version when you make backward compatible bug
fixes (e.g.,
0.1.1)
Starting with 0.x.x indicates your software is in
initial development and the API is not yet stable.
Challenge 1: What belongs in a release?
Take one minute to reflect:
- What information would help a future you understand what changed in this version?
Useful release notes include:
- what changed
- what was added or removed
- what bugs were fixed
- what might break for users
- anything important about reproducibility
Clear release notes help both people and tools interpret your software’s evolution.
Minting a DOI with Zenodo Sandbox
Use sandbox.zenodo.org, not production Zenodo. Real
Zenodo records and DOIs are persistent and cannot be deleted, so they
are not appropriate for practice. Say it before you share your screen,
and have helpers watch for learners who land on zenodo.org
by habit.
To practice minting a DOI without polluting the permanent scholarly record, we will use Zenodo Sandbox. It works exactly like the real Zenodo but is for testing.
Practice on the sandbox, not real Zenodo
Real Zenodo records are permanent: a published DOI cannot be deleted. Use https://sandbox.zenodo.org for this exercise, and switch to real Zenodo only when you are depositing software you actually want on the scholarly record.
Predict: what happens when you publish?
Your GitHub repository is connected to Zenodo and you publish a new release. Predict: what does Zenodo do, with no further action from you?
Zenodo detects the release, downloads and archives a snapshot of the repository at that tag, and mints a permanent DOI for it. The archived version no longer depends on GitHub staying online.
The Complete 6-Step Workflow
Step 1: Log in to Zenodo with GitHub
- Visit https://sandbox.zenodo.org
- Click “Log in with GitHub”
- Authorize Zenodo to access your repositories
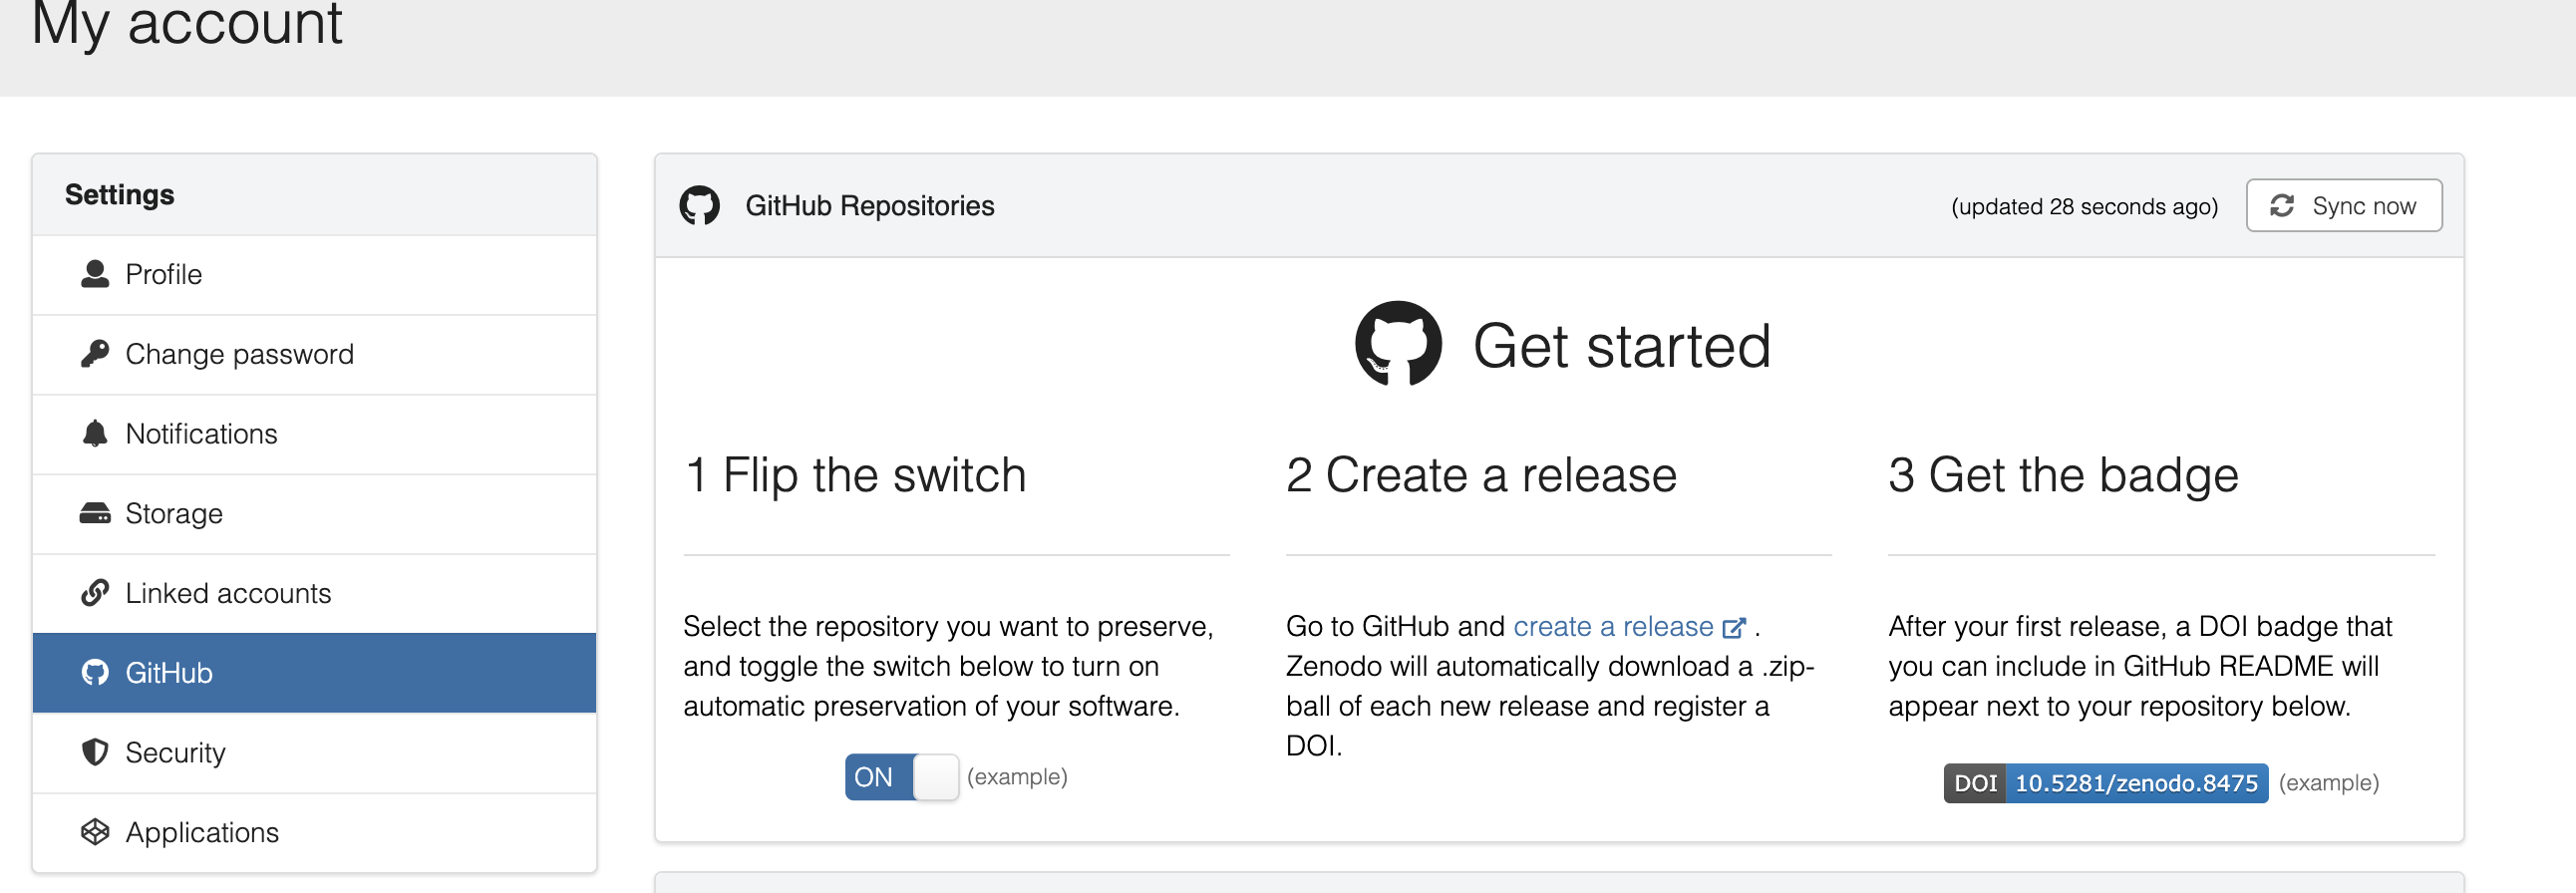
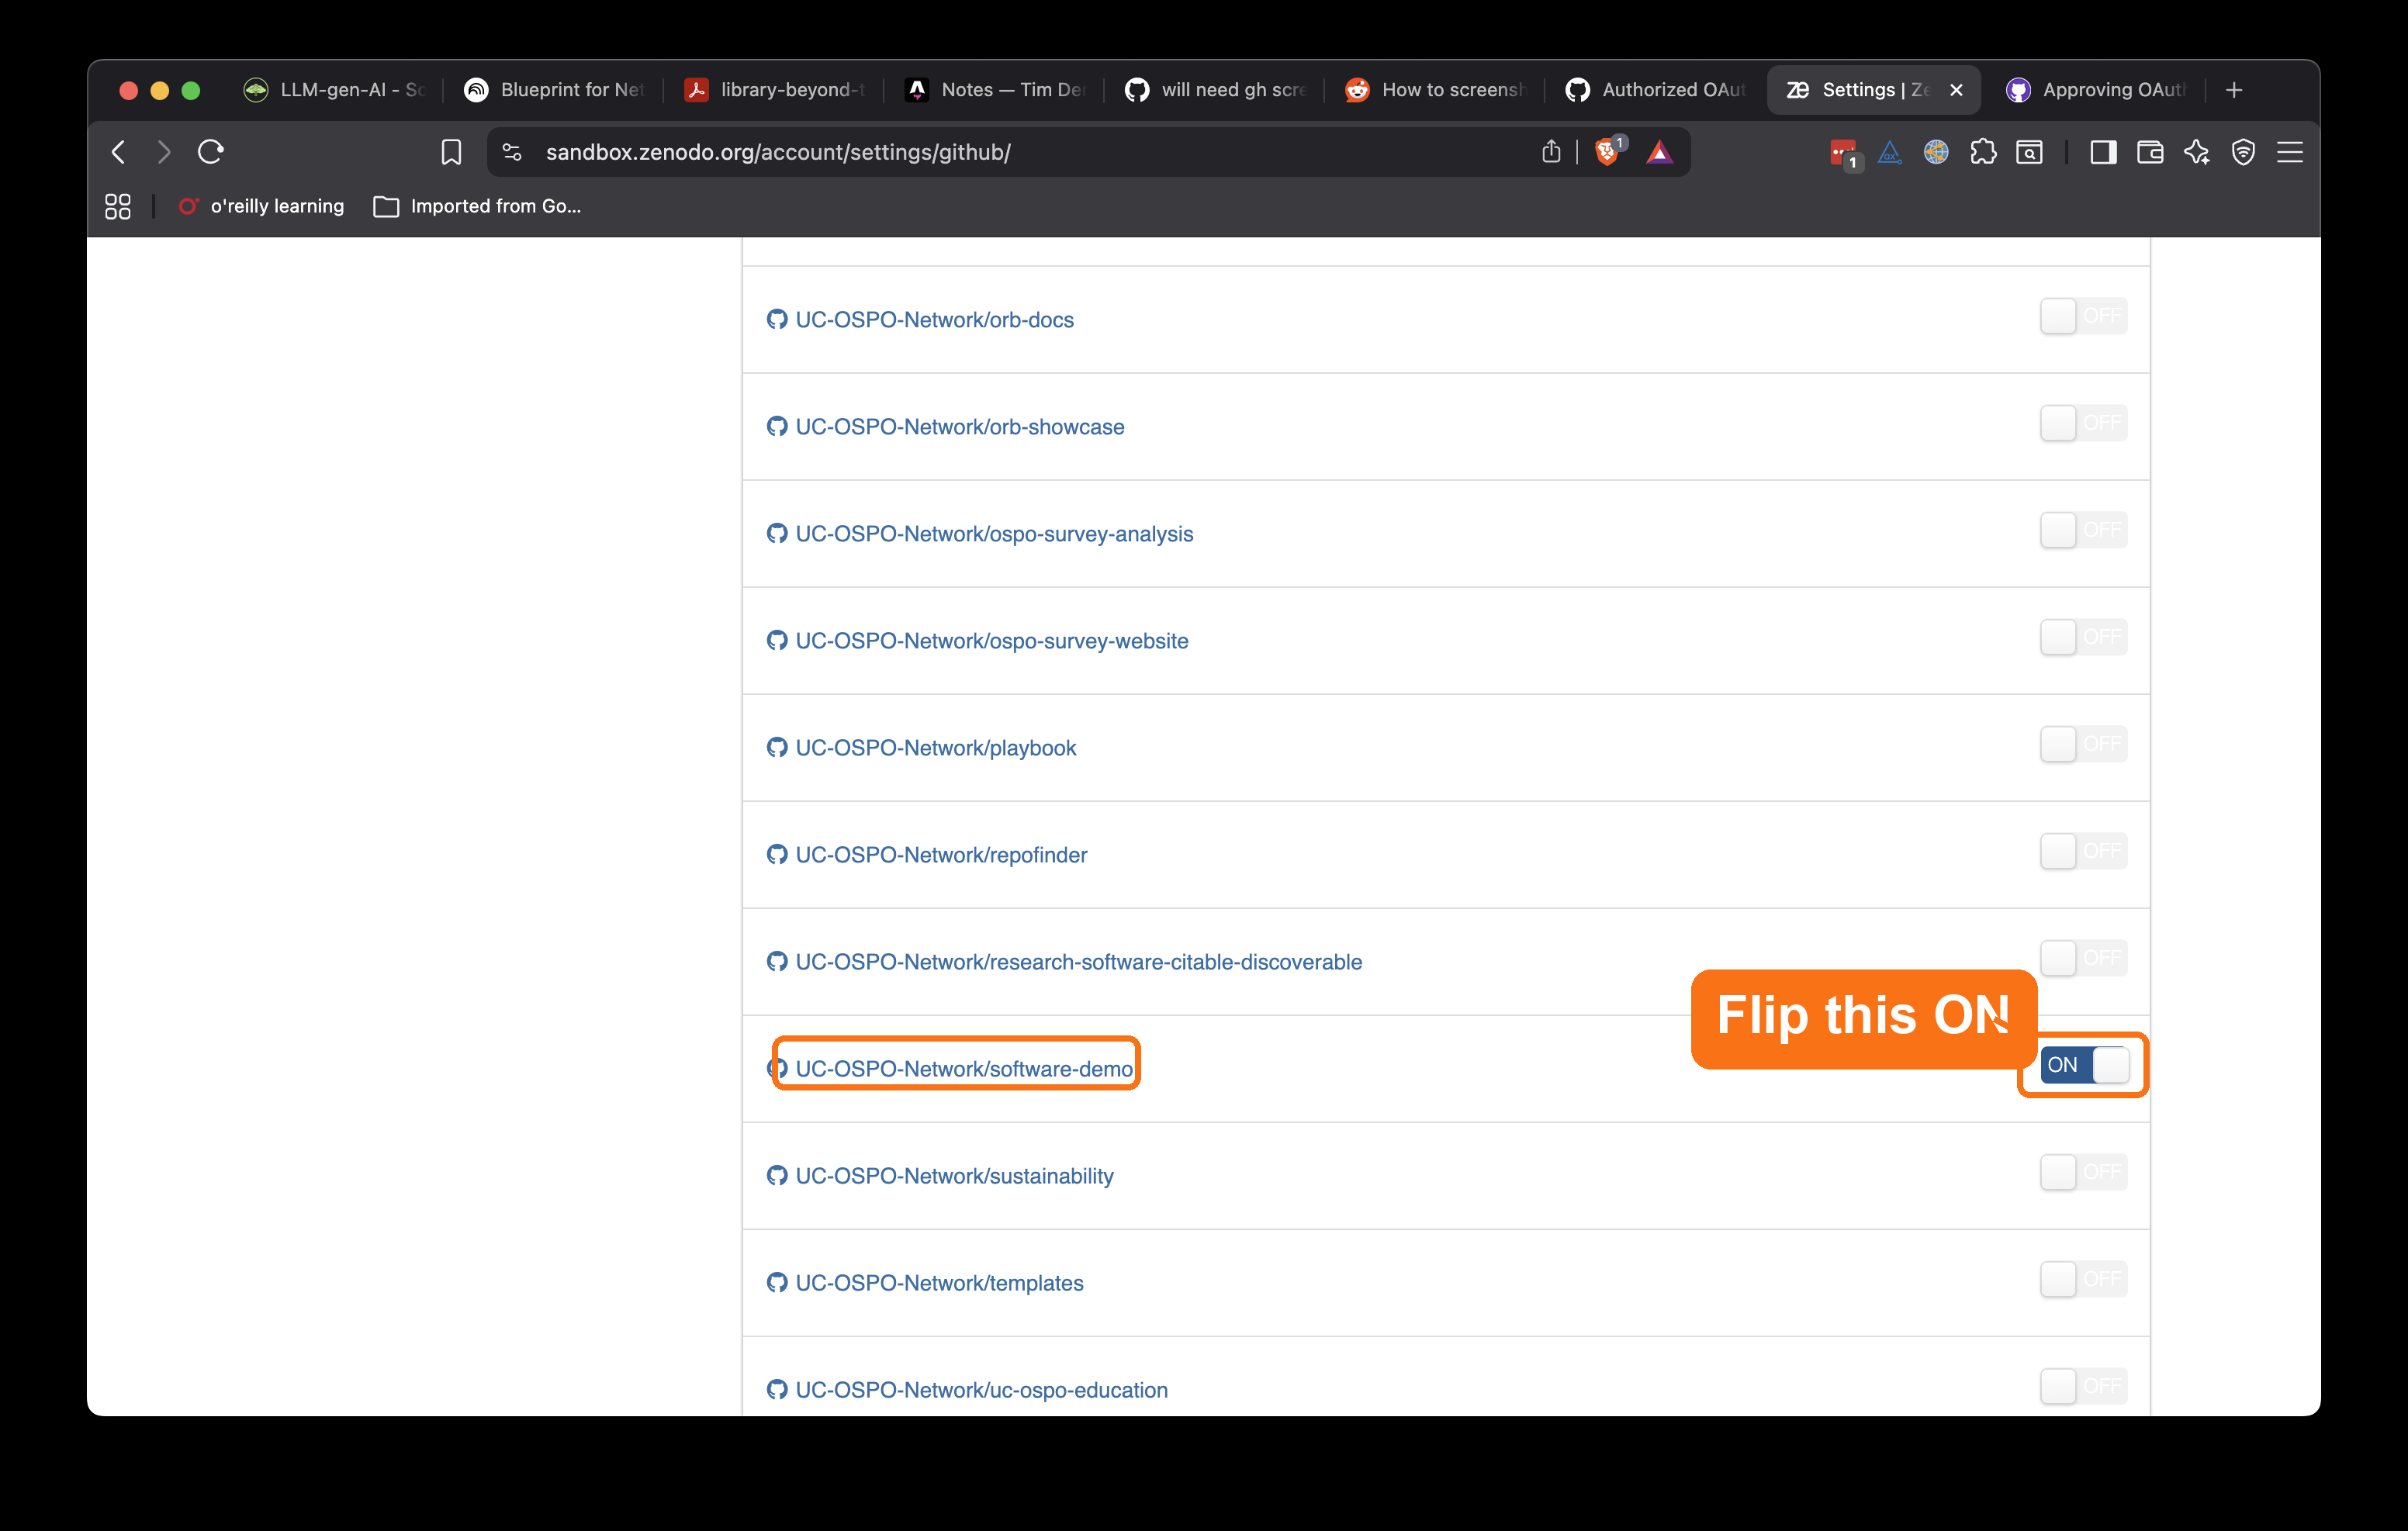
Step 2: Enable your repository (toggle ON)
- Go to Settings → GitHub in Zenodo Sandbox
- Find your repository in the list
- Toggle the switch to ON (green)
- This tells Zenodo to watch for new releases
Step 3: Create GitHub Release (tag v0.1.0)
- Go to your GitHub repository
- Click Releases → Draft a new release
- Create a tag:
v0.1.0 - Add release notes describing what’s in this version
- Click Publish release
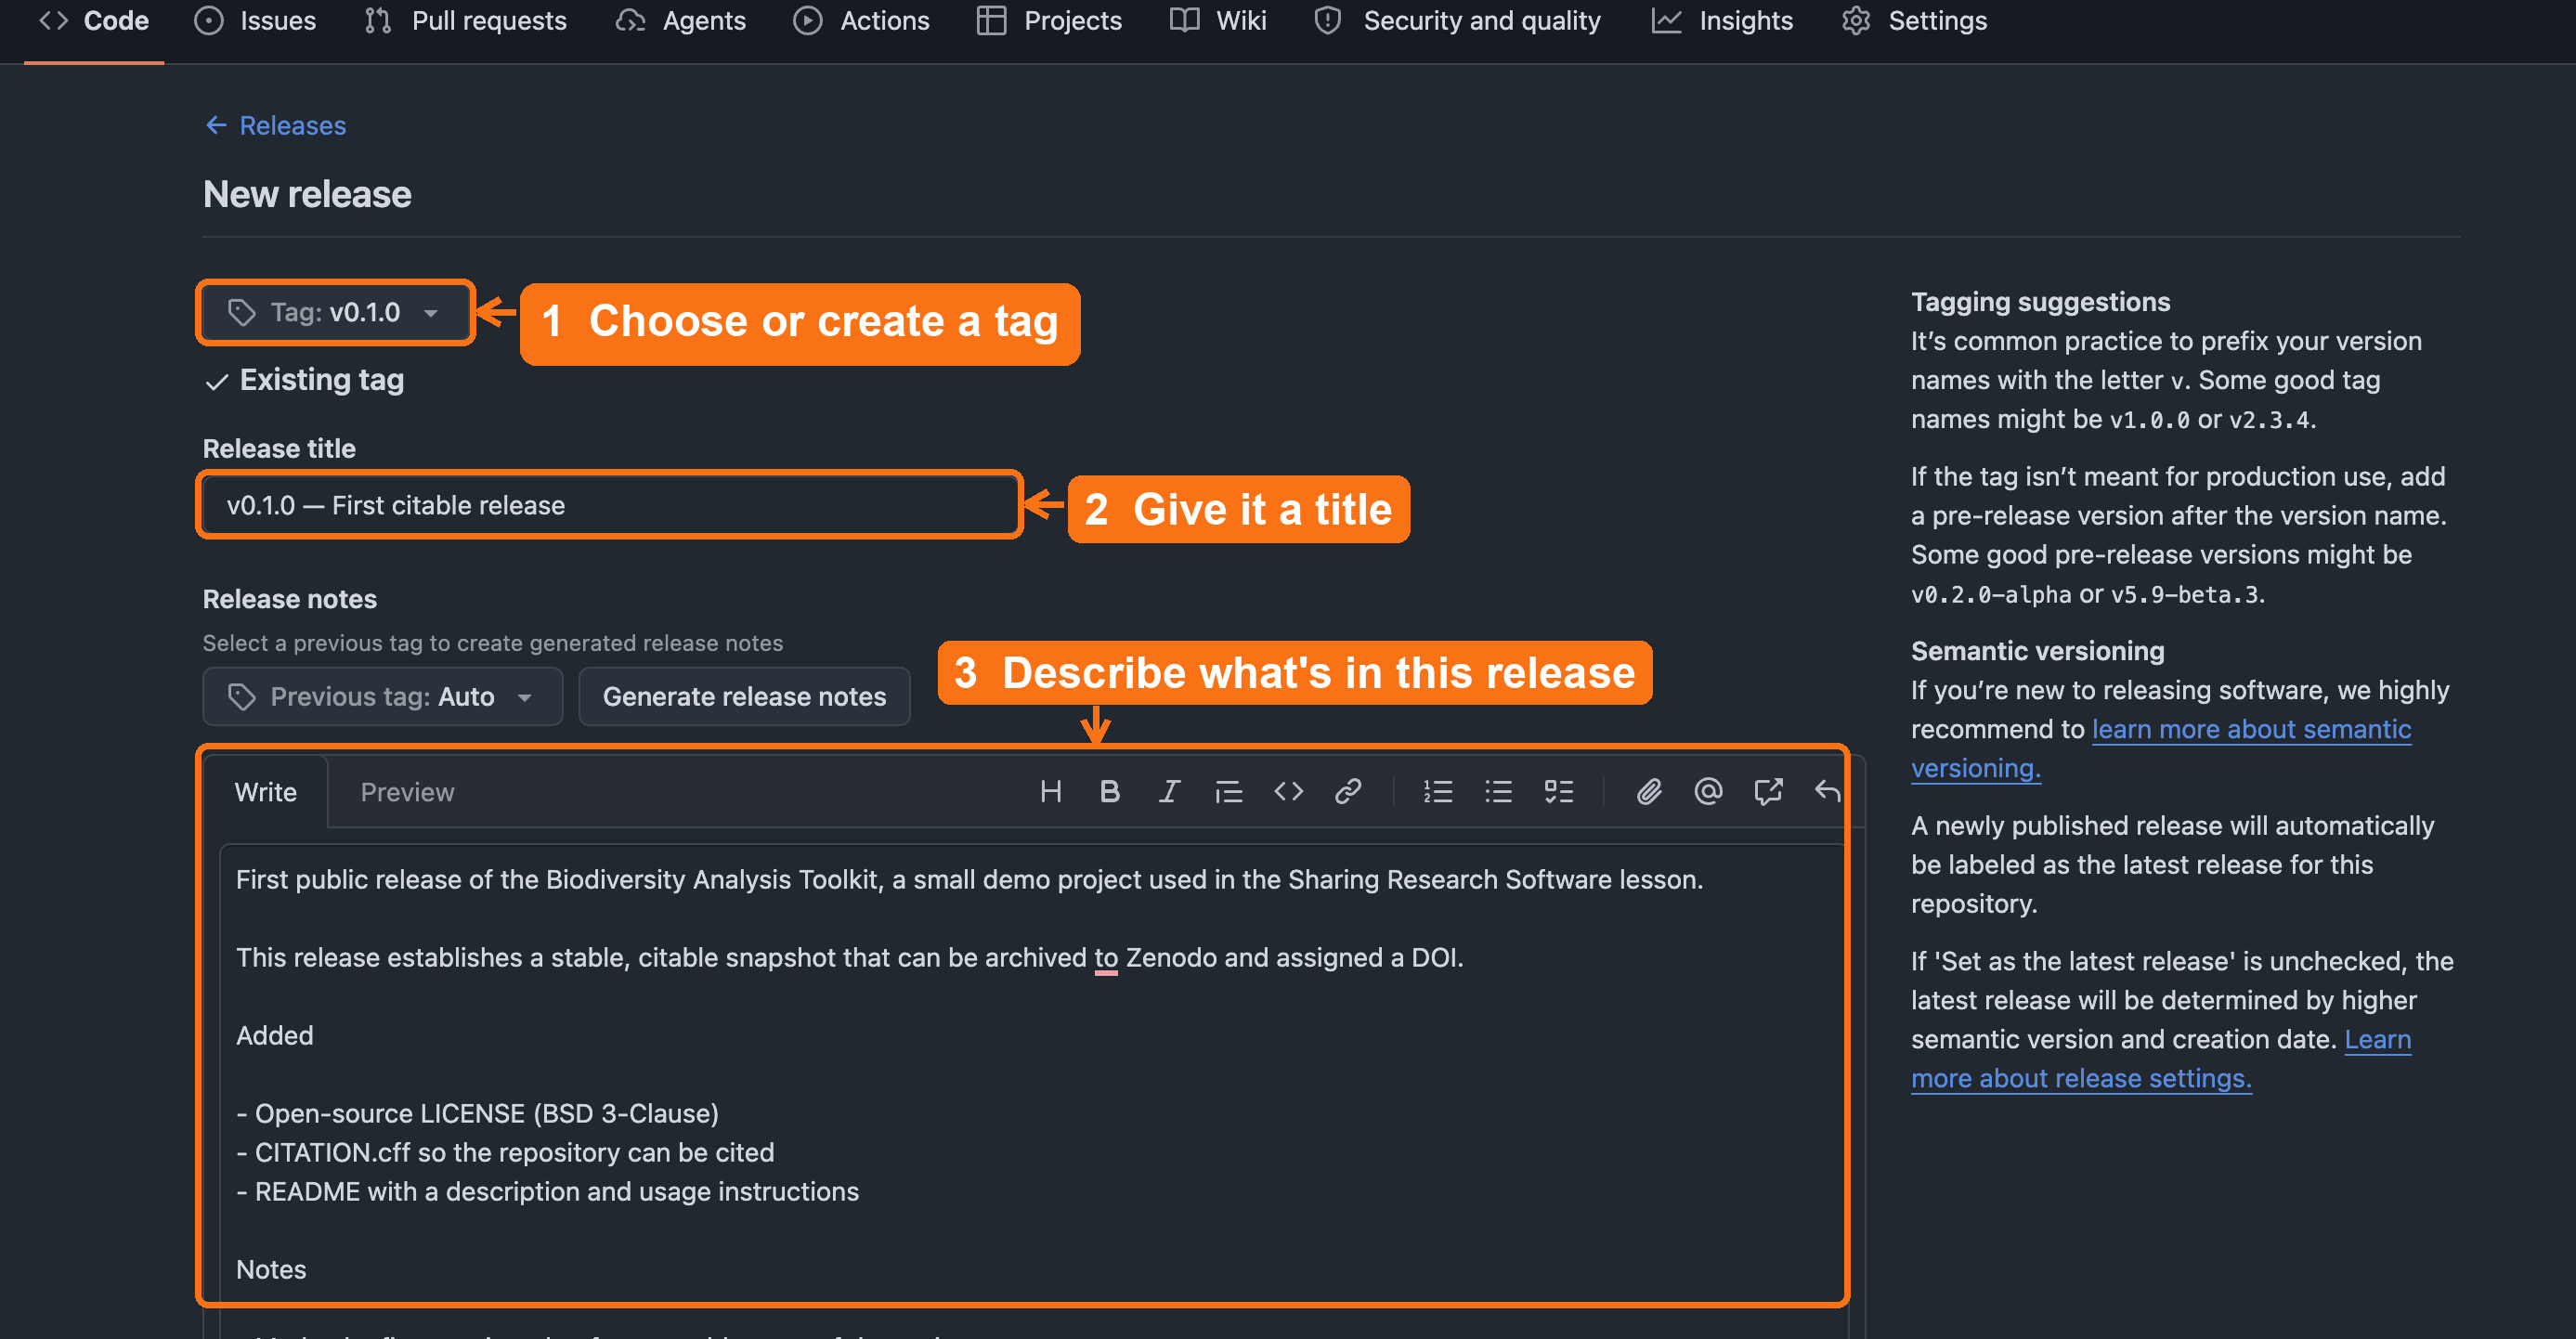
v0.1.0, add a release title,
describe what’s in the release, then click Publish
release (below the fold).Step 4: Zenodo auto-archives and mints DOI
- Zenodo automatically detects your new release
- Creates an archived snapshot
- Assigns a permanent DOI
- Wait a few minutes for processing
Step 5: Add DOI badge to your README
- Copy the DOI badge from your Zenodo record
- Add it to the top of your README:
MARKDOWN
[](https://doi.org/10.5281/zenodo.123456)Step 6: Update your CFF file with your DOI
- Add the DOI to your
CITATION.cff:
Result: You now have LICENSE, CITATION.cff, and DOI.
What the DOI actually archived
Zenodo archived the repository as it existed the moment you
clicked Publish release. That snapshot is fixed. The
CITATION.cff edit you just made in Step 6, and any later
README or metadata changes, update the live GitHub repository and will
be captured by your next release, not the one already archived.
If you want the archived snapshot itself to contain the DOI, make a new
release after updating the file.
This point is subtle and important, so slow down. Say: “GitHub is the live working copy; Zenodo archived what existed at release time.” Then ask a learner to restate, in their own words, the difference between a post-release GitHub edit and the already-archived release snapshot. If they can restate it, they have the key mental model of the episode.
If Zenodo can’t see your repository
Zenodo only lists repositories you have admin rights on. For an
organization repo, an org owner may need to approve Zenodo’s access
first; for this exercise, forking under your personal account avoids the
problem entirely. (Keep the sandbox rule in mind too: a
10.5072/... sandbox DOI is for practice, never for a paper
or a real CITATION.cff.)
With the release published and the DOI minted, the citable-software chain is complete. Here is how the pieces you have added map onto FAIR:
Now You Have Everything
- ✅ F - Findable: Added DOI, CITATION.cff, rich metadata
- ✅ A - Accessible: Public GitHub, archived on Zenodo
- ✅ I - Interoperable: Standard formats (YAML, CFF)
- ✅ R - Reusable: LICENSE (BSD-3), README with setup
Check your work
Compare your fork against the after-release
reference branch on the demo
repository. It shows the target state after this episode: a tagged
release and a CITATION.cff updated with the DOI.
With the DOI minted, one practical question remains, and it is the one researchers will bring straight to you: which DOI do they actually cite?
Supporting others: which DOI do I cite?
Zenodo mints two DOIs for every project, and the distinction is worth knowing cold. Librarians already have it: it is the work versus the edition, “cite the exact edition you quoted” versus “refer to the work as a whole.”
- Version DOI points to one exact release. Cite this when the precise software state matters for reproducibility, such as the version that produced a paper’s results.
- Concept DOI points to the project across all versions and always resolves to the latest. Cite this when you want to refer to the software in general.
A safe default to teach: cite the version DOI in a
methods section, and use the concept DOI in a README or
project page. And if a repository ever has both a
CITATION.cff and a .zenodo.json, remember that
Zenodo uses the .zenodo.json for the archived release
metadata.
Once the DOI appears, ask: “Which DOI would you tell the researcher to put in the methods section, the version DOI or the concept DOI, and why?” Expected answer: the version DOI for exact reproducibility (the state that produced the results); the concept DOI to refer to the project in general. This turns the mechanic into an advising decision they will actually be asked to make.
Whichever DOI you cite, durability is the whole point: even if GitHub disappears, your DOI still works. The GitHub-Zenodo link works like a deposit, so each release is archived at CERN, independent of GitHub’s fate. The workshop can burn down; the deposited copy survives.
Zenodo archives a snapshot of your code at release time. Software Heritage goes further: it continuously crawls GitHub, GitLab, and other forges and archives everything, assigning a SWHID (Software Heritage Identifier) to every file, directory, commit, and release.
A SWHID looks like this:
swh:1:rel:22ece559cc7cc2364edc5e5593d63ae8bd229f9fIt points to an exact, immutable snapshot that survives forge closures (Gitorious shut down in 2015; Google Code in 2016, both making thousands of repos unreachable). Your Zenodo DOI is the right identifier for citation; a SWHID is the long-term preservation record.
To find and record your SWHID:
- Go to https://archive.softwareheritage.org/
- Paste your GitHub repository URL into the search box
- If your repo is already archived, copy the SWHID for your release
- If it hasn’t been crawled yet, click Save code now to trigger immediate archival
- Once archived, add the SWHID to your
CITATION.cff:
This approach is recommended in the 2026 CODE Beyond FAIR roadmap (Di Cosmo et al., Scientific Data).
Challenge 2: Why are versioned DOIs important?
Why might it matter that a DOI points to a specific release rather than the whole project?
Versioned DOIs:
- support reproducibility by identifying an exact snapshot
- prevent confusion when the software changes
- allow users to cite precisely the version they used
- support FAIR4RS and publisher guidelines
- Software is citable as soon as it includes a citation file and a
stable version.
- GitHub releases create versioned snapshots for citation.
- DOIs are optional but strengthen discoverability, persistence, and
reproducibility.
- Zenodo can automatically mint a DOI for each GitHub release.
Content from Improving Metadata and Discoverability
Last updated on 2026-07-07 | Edit this page
Estimated time: 30 minutes
Overview
Questions
- What metadata makes research software easier to find and reuse?
- How can we improve discoverability across GitHub, Zenodo, and scholarly indexes?
Objectives
- Identify key metadata elements that increase visibility and reuse.
- Enhance discoverability using GitHub features and Zenodo metadata fields.
- Connect metadata across CITATION.cff, GitHub, and your DOI record for consistency.
- Supporting others: audit a repository’s metadata and prioritize the single highest-value fix.
Findability comes from description
A Zenodo record with a bare title and no keywords is a catalog record with no subject headings: retrievable if you already know it exists, invisible if you don’t. Most research software sits behind exactly that kind of record. This episode is the one where the lesson lands fully inside a library audience’s expertise, because making things findable through description is what libraries do. The systems are GitHub topics, Zenodo fields, and a README instead of a catalog, but the judgment, what would a seeker search for and does this record contain it, is unchanged.
Clear metadata helps others understand, evaluate, and find your software.
Make README improvements and GitHub topics the
hands-on work here. Treat .zenodo.json, Software Heritage,
CONTRIBUTING.md, and CODE_OF_CONDUCT.md as
instructor demo or optional reading. In a half-day workshop, do not make
every extension a hands-on task; it is the fastest way to run out of
time before the wrap-up.
It also reduces the cognitive effort for future users because essential information is organized and easy to locate.
In earlier episodes, you created:
- a CITATION.cff file
- a license
- a repository structure
- a Zenodo record with a DOI
This episode brings these together. You will describe your project in consistent ways across platforms so search engines, citation tools, and colleagues can discover it.
Encourage learners to compare well-described repositories with sparse
ones.
Highlight how even small metadata additions increase visibility in
GitHub search, Zenodo indexing, and DataCite services.
Why this episode matters: this is where a librarian in the room can visibly outperform the researchers, which matters for how the campus sees the service. Researchers usually treat metadata as a form to rush through; a scholcomm professional treats it as the mechanism of discovery. The pitch to the researcher is blunt: the work is finished, and five minutes of description determines whether anyone ever finds it.
What counts as useful metadata?
Good metadata answers predictable questions with minimal effort from the reader:
- What is this software? (short description or abstract)
- Who made it? (authors, ORCIDs)
- How do I cite it? (CITATION.cff + DOI)
- What domain is it for? (keywords)
-
What else does it relate to?
- related article DOI
- datasets used
- funding source
- project website
- related article DOI
You may add these in multiple places, but they should remain consistent. This is authority control: the title, authors, and description should read the same in the README, the CITATION.cff, and the Zenodo record, for the same reason a name reads the same across catalog records. When they drift, indexes treat one piece of software as several, and its citations scatter.
GitHub-specific discoverability features
GitHub uses structured metadata to improve search ranking and cross-repository linking.
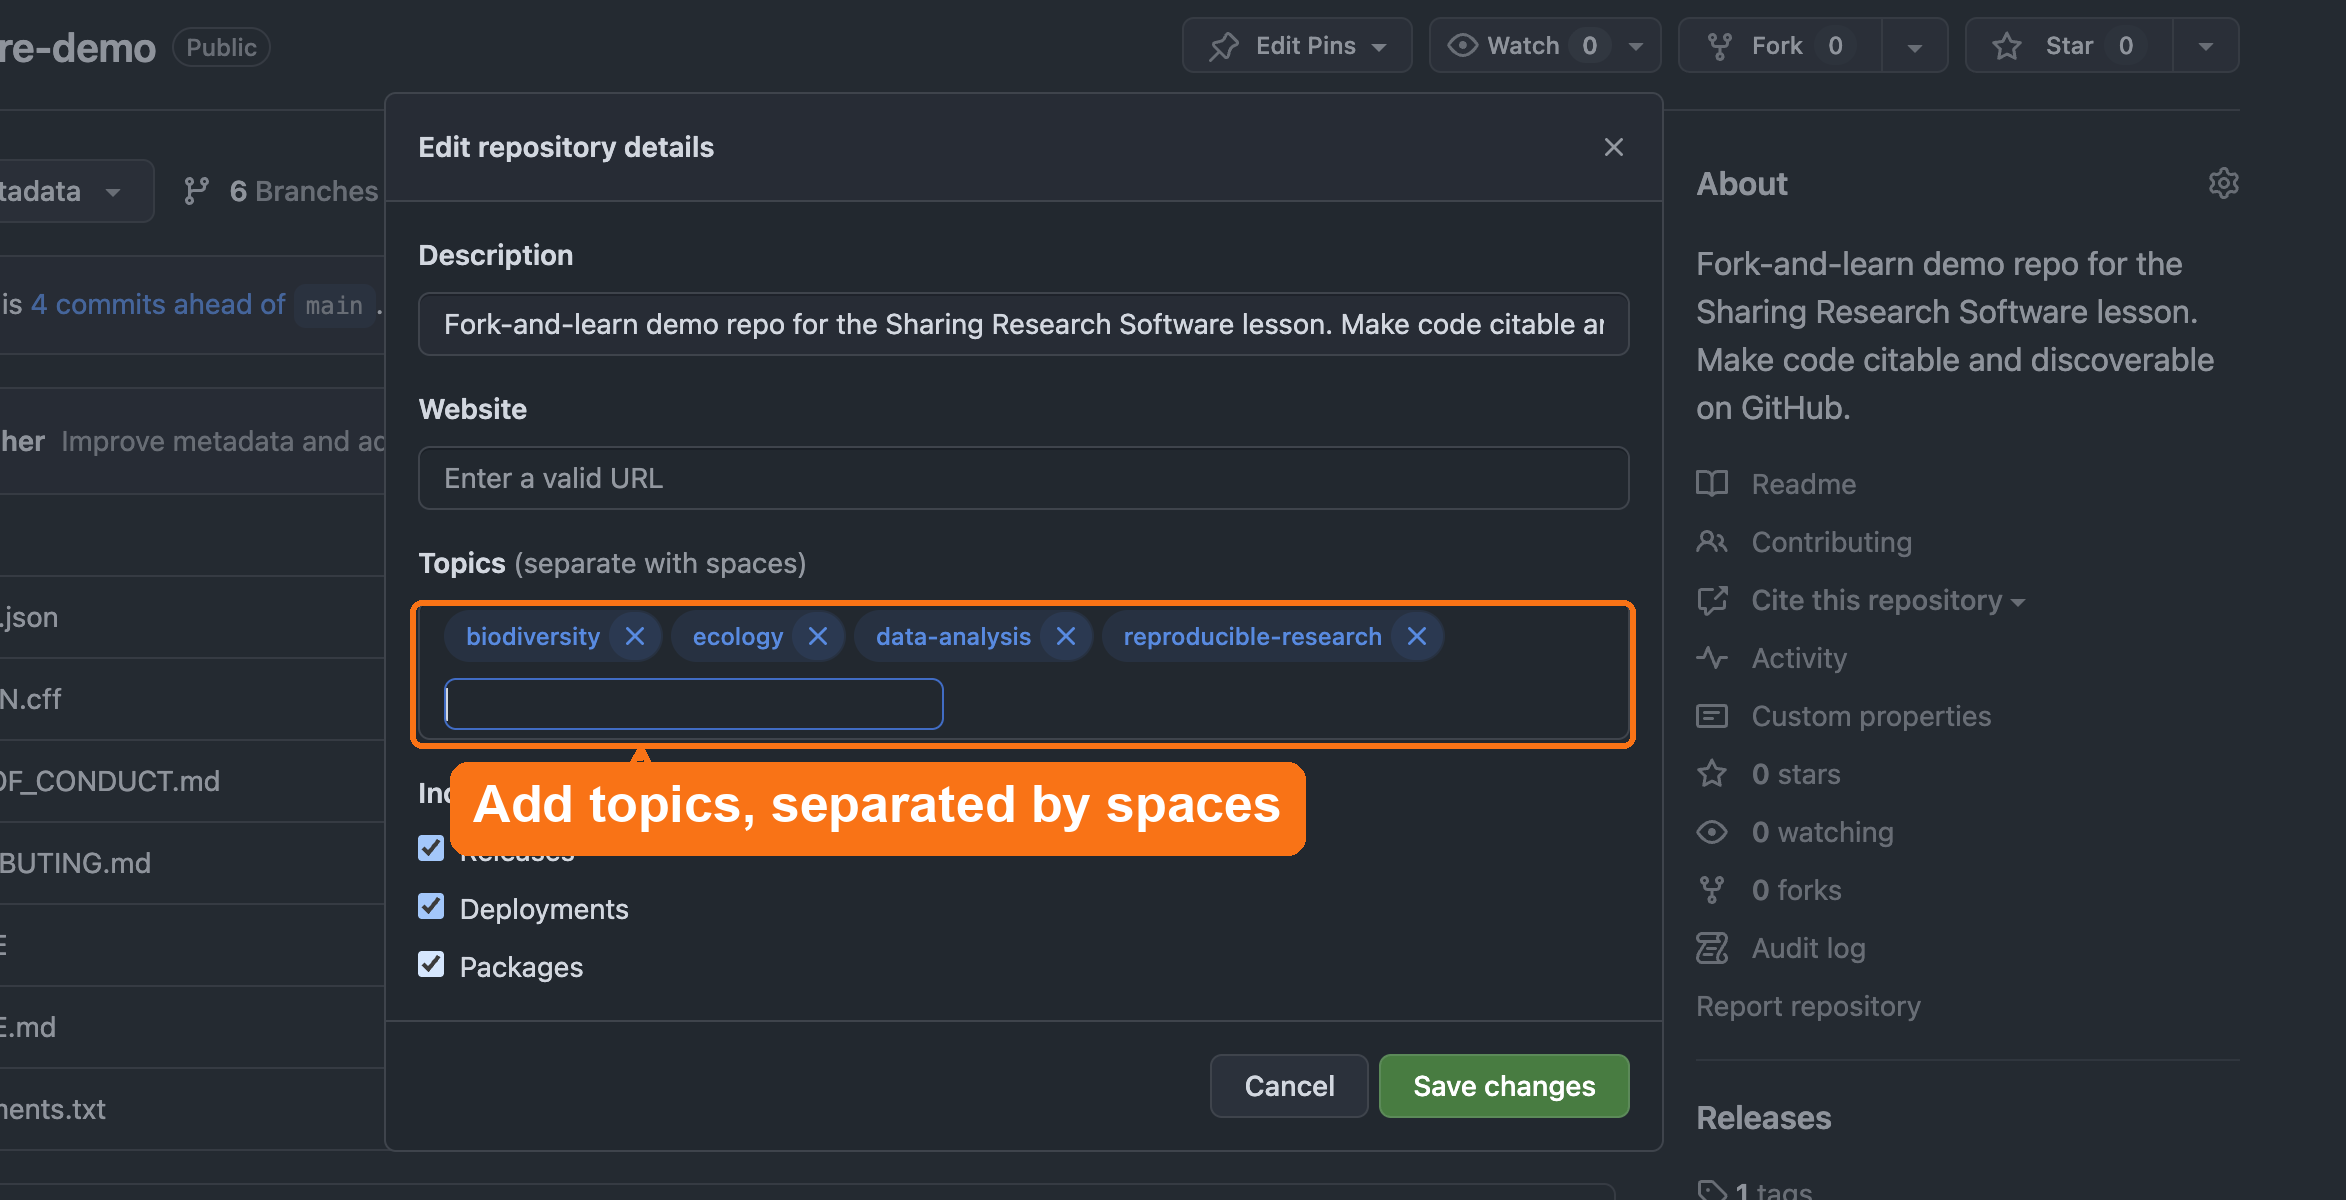
Add these items in
Settings → General → Topics:
- discipline tags (e.g.,
geospatial,text-mining,materials-science) - methodological tags (
simulation,visualization,machine-learning) - language tags (
python,r)
Writing an Effective README
The 30-Second Rule
Your README is your software’s front door.
If users can’t understand what it does, how to install it, or how to use it in 30 seconds → they leave.
A collection without a finding aid can only be used by someone with time to read every box. A repo without a real README can only be used by its author. The 30-second rule is scope-and-content note discipline applied to code.
README Structure (7 Essential Sections)
The UC OSPO README Guide (UC-specific) recommends this standard structure:
- About: What does this do? (2-3 sentences)
- Features: Key capabilities (Reproducible, Citable, Open source)
- Getting Started: Prerequisites + installation
- Usage: Minimal working example
- Citation: Link to CITATION.cff or DOI
- License: Explicitly state terms (e.g., “BSD-3 - see LICENSE file”)
- Contact: How to get help
Before vs. After Example
❌ Before (main, starting state)
MARKDOWN
# Biodiversity Analysis Toolkit

A script.

No description. No instructions. No citation. Unusable.
✅ After (after-metadata)
MARKDOWN
# Biodiversity Analysis Toolkit

Analysis tools for biodiversity research.

## Features
- Citable (DOI) • Open source (BSD-3) • Documented

## Getting Started
```bash
pip install -r requirements.txt
python src/analysis.py
```

## Citation
[zenodo.org/badge/DOI/10.5281/zenodo.123456.svg]

License: BSD-3 - see LICENSE file
Professional. Citable. Usable.
README Best Practices: 5 Quick Tips
- Clear description → Answer “What problem does this solve?”
- Show, don’t tell → Include code examples
- Link metadata → Add DOI badge, link CITATION.cff
- Keep updated → Refresh when features change
- Use a template → UC OSPO Templates (UC-specific) or Awesome README
Every tip maps to FAIR principles.
Don’t Reinvent the Wheel
- Awesome README: curated examples from real open-source projects
- UC OSPO README Template (UC-specific): ready-to-use template
It is also critical to link your metadata:
- Add a badge for your Zenodo DOI
- Link to your
CITATION.cfffile
A structured README ensures researchers can quickly evaluate and use your software.
Beyond the README: Community Health Files
Beyond technical metadata, files that describe how to interact with your project matter for long-term sustainability and for signaling that the project is welcoming.
GitHub looks for these files:
CONTRIBUTING.md → How to contribute
The CONTRIBUTING.md file is the first place new
contributors look to see if a project is open to participation.
Following a contributing guide template (the UC
OSPO Contributing Guide (UC-specific) is one good example)
ensures you cover essential ground:
- Welcome Statement: Explicitly inviting others to join
- Ways to Contribute: Identifying non-code contributions (e.g., documentation, testing, issues)
- Setup Instructions: How to get the project running locally
- Pull Request Lifecycle: What happens after a contribution is submitted
CODE_OF_CONDUCT.md → Behavioral standards
A CODE_OF_CONDUCT.md establishes behavioral expectations
and ensures a safe, inclusive environment for all researchers. The
standard choice is the Contributor Covenant,
widely adopted across open-source projects. (See also: UC
OSPO Code of Conduct Guide (UC-specific))
CHANGELOG.md → Version history
A CHANGELOG.md documents what changed between versions.
This helps users understand:
- What’s new in each release
- What bugs were fixed
- What breaking changes occurred
- How the software evolved over time
Why it matters: Signals your project is professionally managed and welcoming.
Templates Available
- Choose a License: license selection
- Contributor Covenant: code of conduct template
- Keep a Changelog: changelog format guide
- UC OSPO Template Repository (UC-specific): ready-to-use CONTRIBUTING.md, CODE_OF_CONDUCT.md, CHANGELOG.md, README.md
Adding these files to your repository root helps GitHub display a “Community Standards” checklist in your insights, signaling that your project is professionally managed and ready for collaboration.
GitHub recognizes certain filenames
You have now seen this pattern several times: name a file the way GitHub expects and the platform does more than store text. It may offer a template, add a link to the sidebar, tick an item on the community checklist, or route issues, security reports, and citations. A few worth knowing:
| File (in the repo root, unless noted) | What GitHub does |
|---|---|
README.md |
Renders as the repository’s landing page |
LICENSE |
Offers a license-template picker; shows the detected license |
CITATION.cff |
Adds the “Cite this repository” link with ready-made APA/BibTeX |
CODE_OF_CONDUCT.md |
Offers a code-of-conduct template; counts toward the community profile |
CONTRIBUTING.md |
Links contributor guidelines when someone opens an issue or PR |
SUPPORT.md |
Points people to your support channels from the new-issue screen |
SECURITY.md |
Becomes the security policy; “report a vulnerability here, not in a public issue” |
.github/ISSUE_TEMPLATE/*.yml |
Turns “New issue” into a structured intake form |
Two caveats worth passing on in a consultation: most of this only appears after you commit the file to the default branch, and an organization’s policies can disable or constrain some features. GitHub also changes these helpers over time, so teach the pattern (“the filename is a signal”) rather than the exact button.
Institutional Repositories: Dataverse, Dryad, and Zenodo
Many institutions use repositories like Dataverse or Dryad for research data deposits. These are good for datasets but have limited software support; they don’t integrate with GitHub releases or mint version-specific DOIs automatically.
For software, Zenodo is the recommended deposit location because:
- It integrates directly with GitHub to archive each release automatically
- It mints a DOI for every version
- Records flow into DataCite and are indexed by Google Scholar and library catalogs
- It’s free, CERN-operated, and widely recognized by journals and funders
What about your institution’s repository?
If your institution requires or prefers a local IR (Dataverse instance, DSpace, etc.), you can deposit there in addition to Zenodo, not instead of it. Use the Zenodo DOI as the persistent identifier in your CITATION.cff, and note the institutional deposit in your README or Zenodo metadata as a related work.
Some funders (NSF, NIH, Wellcome Trust) have specific deposit requirements. Check your award terms before deciding where the authoritative copy lives.
Zenodo and DOI metadata
When you deposit software on Zenodo, the record flows into:
- DataCite: the DOI registration agency for research data and software; DataCite records are harvested by library catalogs, institutional discovery systems, and tools like OpenAlex and Scholix
- Google Scholar: picks up Zenodo records with structured metadata
- Library catalogs: many discovery layers (EBSCO, Ex Libris Primo, OCLC WorldCat) harvest DataCite metadata, meaning your software can appear in a library search alongside journal articles
- Domain repositories that harvest DOIs
What this means practically: the metadata you put into your Zenodo record is the metadata that librarians and discovery systems see. Thin metadata (no description, no keywords, no author ORCIDs) limits findability even if the DOI is valid.
.zenodo.json overrides
CITATION.cff
If a repository contains a .zenodo.json file, Zenodo
uses that file for the metadata of a GitHub-archived
release and ignores CITATION.cff. The two files can drift
apart, so if you add a .zenodo.json (some projects do, for
richer Zenodo fields), keep the authors, title, and keywords consistent
with your CITATION.cff, or you will publish two different
citation records for the same software.
Do not present .zenodo.json as required for all
projects. Frame it as an advanced override, used only when Zenodo
metadata needs more control than CITATION.cff provides.
Most learners should leave with CITATION.cff as their one
citation file.
Add or refine:
- authors + ORCIDs
- keywords (discipline tags, method tags, language tags; use the same ones you add to GitHub Topics)
- related works (link to the paper that used this software, the dataset it analyzes, the grant that funded it)
- funding references
- version notes
- a readable software description (2-3 sentences; think abstract, not README)
Your goal is context. A researcher or a librarian helping a researcher should be able to read the Zenodo record and decide in 30 seconds whether this software is relevant to them.
Supporting others
Metadata work is where libraries already have deep expertise, so this is the most natural consultation territory in the lesson. The trap is trying to perfect everything at once. In practice you are doing triage: identifying the single highest-value fix for the time the researcher actually has.
A rough priority order when a record or repo is thin:
- A readable description (most discovery systems show this first; an empty one is the biggest single loss).
- Author ORCIDs, so credit attaches to people, not just names. Every J. Chen on Zenodo is indistinguishable without one, and software credit is hard enough to accumulate without splitting it across identities.
-
Keywords reused consistently across GitHub Topics,
CITATION.cff, and Zenodo. - Related works linking the software to its paper, dataset, and grant.
Because this metadata is harvested by DataCite, library discovery layers, and Google Scholar, the librarian framing is concrete: thin metadata means the software never surfaces in the catalog alongside the article. You are not just tidying a record, you are deciding whether it is findable at all.
Challenge 1: Identify Useful Metadata
List three elements you would add to improve a repository’s discoverability.
Examples:
- ORCID IDs for each author
- Keywords describing the domain and function
- A link to a related article or dataset
- A project description in your README
- Funding acknowledgment
Challenge 2: Improve Your Zenodo Record
After generating a DOI in the earlier episode, expand its metadata:
- Open your Zenodo record.
- Select “Edit.”
- Add:
- keywords
- authors and ORCIDs
- description
- related publication DOIs
- funding
- keywords
- Save and publish the updated record.
Which change makes it discoverable?
A researcher’s tool has been public on GitHub for a year, but no one outside their lab has ever found it. The repository has a one-line README, no topics, and a Zenodo deposit with only a title. Which single change will do the most to make the software discoverable?
A. Add collaborators so the repository is “more public” B. Add descriptive GitHub topics, plus matching keywords and a description on the Zenodo record C. Push more frequent commits so the repository looks active D. Rename the repository to something shorter and catchier
B. Discovery happens through description, not access level or activity. Topics, keywords, and descriptions are what GitHub search, Zenodo, and DataCite-fed indexes actually match a query against. The repo is already public, so A adds nothing to discoverability; commit frequency (C) does not affect search ranking for discovery; and a shorter name (D) is cosmetic. This is the same reason a catalog record with no subject headings is nearly invisible: findability comes from the metadata, not from the object’s mere existence.
- Metadata increases discoverability in GitHub, Zenodo, and scholarly
indexes.
- Use consistent information across CITATION.cff, README, GitHub
topics, and Zenodo.
- Thoughtful metadata supports FAIR principles and helps others reuse your software.
Content from Managing Reproducible Environments with pixi
Last updated on 2026-07-05 | Edit this page
Estimated time: 30 minutes
Optional Episode
This episode covers environment management using pixi.
It is optional; you can skip it and move directly to Improving Metadata and
Discoverability.
If you skip this episode, you still complete every citation step.
Unlike the rest of the lesson, which runs entirely in the browser, this
episode requires tools installed on your own computer
(pixi and a terminal) and a local
clone of your fork. Its files live only in the optional-pixi
reference branch, not in your main project, so skipping it leaves
nothing unfinished. Confirm with your instructor that you’re running the
full track before installing anything.
Citation-focused learners are done with the core lesson after the metadata episode; send them off or into a break. Only full-track learners continue, and they need a local clone and pixi installed. Do not make the whole room troubleshoot installations. State clearly who this episode is for before anyone opens a terminal.
Other environment tools: conda,
mamba, pip/venv, and
renv (for R) all serve the same purpose. The concepts here
apply to any environment manager; pixi is used because it handles
Python, R, and other languages with a single tool and generates an
automatic lockfile.
Overview
Questions
- Why do software projects need well defined environments?
- How can
pixihelp learners run the same code the developer used? - How does environment management improve the reproducibility and citability of research software?
Objectives
- Explain why environment definition is central to reproducible research.
- Create a minimal
pixi.tomlfile for a project. - Use
pixito run Python or R code inside a clean, isolated environment. - Describe how environment files support FAIR software and citation practices.
- Supporting others: recommend an environment tool that fits a researcher’s stack rather than defaulting to one.
This episode is last in the lesson order and is the only one that leaves the browser: it needs pixi and a terminal on the learner’s own machine, plus a local clone of their fork. Because the rest of the lesson is browser-only, confirm during setup which learners are prepared for the full track. Anyone who only wants their code cited can stop after the metadata episode with a complete, citable repository.
The optional-pixi
reference branch builds on after-metadata,
so it shows pixi added to an already-finished project. Have learners
view it in the browser for the target pixi.toml and
lockfile, then work along in their local clone. Nothing in the main
project chain depends on pixi, so skipping this episode leaves no loose
ends in anyone’s repository.
Pixi not installed? Learners can follow the concepts without a working pixi installation. The key idea is that a lockfile pins exact dependency versions. That’s the transferable lesson, not the tool itself.
If you skip the hands-on entirely, keep the concept in the room: the R in FAIR quietly depends on this. A deposit that cannot be executed is preserved the way a locked diary is preserved. The question “is there a record of what this needs to run” belongs in the consultation checklist even if the mechanics get referred to research computing.
Why Environments Matter
Digital preservation learned this lesson the hard way: keeping the file is not enough if nobody records what is needed to open it. A WordPerfect document with no format metadata is preserved and unreadable at the same time. Code has the same failure mode. A script depends on specific versions of specific packages, and if that goes unrecorded, the code you carefully licensed, cited, and deposited will not actually run for the person who finds it. An environment file with a lockfile is format metadata for execution: it records, exactly, what this code needs.
The Problem: Research software often “works on my machine” and nowhere else.
Code rots. Python updates, packages break, and 6 months from now, your script won’t run.
Different operating systems, outdated packages, and mismatched library versions frequently break code.
❌ The Vague Way
python = "*" is like saying “I need some food.” In
citation terms, it is a bibliography entry that reads “a dictionary.”
Which one? Printed when?
Problems:
- Works today, breaks tomorrow
- Different versions on different machines
- “Works on my machine” syndrome
What Environment Management Captures
Environment management reduces this friction because it captures:
- The exact language versions used
- Required packages
- The dependency set needed to run the software
- Instructions for reproducing the execution environment
The Payoff: We aren’t just shipping code; we’re shipping the computer state needed to run it.
Why pixi?
pixi is a modern, fast environment manager that works
for Python, R, and many other languages. We use it in this lesson
because it is:
- Cross-platform: Works on macOS, Linux, Windows
- Fast: Faster than Conda
-
Automatic lockfiles: Creates
pixi.lockautomatically, recording the exact resolved versions of every package so others can rebuild the same environment - Multi-language: Supports Python, R, and more
FAIR Connection: Standard formats + clear dependencies = Interoperable & Reusable software
If you are teaching the full track, assign one helper to pixi install and PATH problems. The lead instructor should keep moving with the concept demo and not stop the main room for individual terminal errors. Installation issues are the single most likely time-sink in this episode.
Installing pixi
Full installation docs: https://pixi.sh
Common installation for macOS or Linux:
Windows users can install via MSI installer or
winget.
No preinstalled languages needed
pixi includes its own language runtimes.
Learners do not need preinstalled Python, R, compilers, or system
packages.
Creating a New pixi Project
Create a directory and initialize a pixi project:
This creates a pixi.toml file, which documents your
environment.
Keeping Repositories Clean (.gitignore)
When you run pixi init, it automatically creates a
.gitignore file. This file tells Git which files to
ignore.
For pixi, this is critical because it creates a hidden
folder .pixi/ containing thousands of environment files.
You never want to commit this folder to GitHub. It is
large, platform-specific, and can be regenerated by anyone using your
pixi.lock file.
Always check your .gitignore to ensure
generated files (like .DS_Store, __pycache__,
or data outputs) are not accidentally shared.
Add Python:
Add the NumPy package:
Add R and one package:
Your pixi.toml is now a reproducible record of all
dependencies needed for the software.
What’s Inside pixi.toml?
Here’s what the file looks like (this will be automatically created for you):
TOML
[workspace]
authors = ["Leigh Phan <leighphan@ucla.edu>"]
channels = ["conda-forge"]
name = "myproject"
platforms = ["osx-arm64"]
version = "0.1.0"

[tasks]

[dependencies]
python = ">=3.14.3,<3.15"
numpy = ">=2.4.2,<3"
r = ">=4.5,<4.6"
r-dplyr = ">=1.2.0,<2"
The pixi.toml file is now a reproducible record
of all dependencies needed for the software.
When you run pixi install, it also creates a
pixi.lock file with exact versions locked:
pixi.lock contains:
python = "3.14.3"
numpy = "2.4.2"
r = "4.5.4"
r-dplyr = "1.2.0"
+ 47 other dependencies
This lockfile records the exact resolved versions and per-platform builds, so anyone can rebuild the same environment. It greatly improves reproducibility, though it cannot guarantee that every package will still be available, or behave identically, on every future platform.
Running Code With pixi
Run Python code:
Run R code:
Every command is executed inside the environment described
by pixi.toml.
This makes it easier for others to test, cite, extend, and build upon your work.
How Environments Support Citation and Reuse
A reusable research software project contains not only code, but:
- licensing
- authorship and citation metadata (
CITATION.cff)
- version information
- a documented environment
Including pixi.toml in your repository or DOI deposit
helps future readers:
- recreate the execution environment
- verify results
- adapt your code for new analyses
- evaluate whether the software is FAIR (Findable, Accessible, Interoperable, Reusable)
When publishing your software, include:
the
pixi.tomlfile-
instructions such as:
Supporting others
This is the episode where you should resist prescribing a tool. We
use pixi here because it handles Python and R in
one cross-platform file, which makes it convenient to teach. It is not
the one right answer for everyone you advise.
When someone asks “what should I use to make my environment reproducible?”, advise on fit rather than defaulting:
-
Python-only project, wants speed and simplicity →
uvorpixi -
R-first project →
renvis the mainstream choice - Team already standardized on conda →
conda/mamba/micromamba - Needs heavier isolation (system libraries, services) → containers / dev containers, with the caveat that the learning curve is steeper
The reusable point you are teaching is the principle, not the brand: a documented, locked environment is what makes software runnable later. The advising skill is recognizing whether any such record exists, the way you would check whether a deposit includes format information, not championing a particular tool. Match the tool to the person’s stack and skill level, and don’t make a half-day workshop hinge on any one manager installing cleanly on every laptop.
Challenge: Add a new dependency
Use pixi to add pandas or
r-ggplot2 to your project.
What changed in your pixi.toml file?
Predict: what does the lockfile add?
Your pixi.toml lists python and
numpy with no version numbers. You commit both
pixi.toml and the generated pixi.lock. A year
later, a colleague clones the repo and runs pixi install.
What does pixi.lock guarantee that pixi.toml
alone would not?
pixi.toml records only which packages you want.
Resolved a year apart, it could pull a newer numpy or Python build than
you used. pixi.lock records the exact resolved
versions, including transitive dependencies and per-platform builds, so
your colleague reconstructs the same environment you had. The
.toml is the intent; the .lock is the
reproducible record. That is why both belong in version control.
- Reproducible environments reduce troubleshooting and support more reusable software.
-
pixiprovides fast, cross platform environment management. - The
pixi.tomlfile acts as documentation that supports citation and FAIR4RS principles. - Use
pixi runto execute Python or R code inside a reproducible environment.
Content from Wrap-Up and Reflection
Last updated on 2026-07-07 | Edit this page
Estimated time: 20 minutes
Overview
Questions
- What small steps can make your research software more citable and discoverable?
- How can you apply these practices to your current or future projects?
Objectives
- Reflect on the practical steps taken during the session
- Identify at least one improvement to apply in your own software projects
- Supporting others: assemble a reusable consultation checklist and campus referral map
Curation Work, Not Code Work
The repository this lesson started with was fragile in a specific, diagnosable way: no rights statement, no citation record, no version anyone could pin, no description a search could find. Each episode added one piece of scholarly infrastructure, and none of it required writing code. That is the pattern worth carrying out of the room: making software citable and discoverable is curation work, and curation work is what this audience already does for a living.
Your FAIR4RS Checklist
Congratulations! You’ve transformed fragile research software into a FAIR software project.
What We Covered Today:
✅ F - Findable: Added DOI, CITATION.cff, rich
metadata ✅ A - Accessible: Public GitHub, archived on
Zenodo ✅ I - Interoperable: Standard formats (YAML,
CFF), documented dependencies (requirements.txt, or
pixi.toml on the full track) ✅ R -
Reusable: LICENSE (BSD-3), README with setup, environment
reproducibility
From Fragile to FAIR
Before (main,
starting state):
- ❌ No LICENSE
- ❌ No citation
- ❌ No DOI
- ❌ Minimal README
After (after-metadata):
- ✅ LICENSE (BSD-3)
- ✅ CITATION.cff
- ✅ DOI from Zenodo
- ✅ README with documentation
- ✅ Community health files
- ✅ Reproducible environment (optional pixi episode, on
optional-pixi)
Your software is now citable, discoverable, and reusable.
Reflecting on what you built
Over this session, you’ve learned how to make your research software more visible, citable, and impactful. These small, practical steps support scholarly communication, reproducibility, and the FAIR principles.
Use this time to reflect on what you’ve learned and decide on one action you’ll take with your own project.
Give learners a few minutes of quiet reflection, then facilitate a group discussion. Invite volunteers to share a step they plan to take next.
Closing pitch worth saying out loud: for instructors, the deliverable is not the demo repo, it is a service, a consultation format and a referral map usable the week you get home. For researchers, it is a repeatable habit that costs under an hour per project: every future paper’s code can either be a dead URL in five years or a citable, findable output on your record, and the difference is the checklist you now hold.
Discussion: Choose Your Next Step
Which of the practices from today’s session will you apply to a current or future project? Share your pick with the group: making a repo public, adding a license, archiving on Zenodo, writing a README, creating a CITATION file, or something else.
Challenge 2: Find a FAIR Win
Think of one thing you can do in under 30 minutes to make your software more FAIR.
Examples:
- Add a LICENSE file
- Write a short README
- Register your ORCID on Zenodo
- Create a GitHub release
Supporting others: taking this back to your desk
If you came to this lesson to support researchers rather than to publish your own code, your “next step” is a service, not a single repo. Two things make that practical.
A 5-minute consultation checklist. When a researcher brings you a repository, walk it in this order and name the one highest-value fix. It works for the same reason a reference interview works: a practiced sequence of questions that turns a vague ask into a concrete next step.
A campus referral map. You are the router, not the whole network. A liaison librarian does not answer every question; they know where every question goes. Know who owns each escalation before you need them:
- Ownership / IP / commercialization → Technology Transfer / IP office
- Sensitive or restricted data in a repo → research compliance / IRB / data governance
- Institutional repository, preservation, DOIs at scale → library repository / scholarly comms team
- Open-source strategy, policy, community → your campus OSPO
- Contested authorship or credit → surface to the collaborators; do not arbitrate
Fill in the actual names and contacts for your campus and you have a reusable service, not a one-off answer.
Have each support-staff learner write down one campus referral they still need to identify after the workshop: Tech Transfer, research computing, the data repository, information security, the grants office, or scholarly communications. Naming a real gap turns the demo into a local service map they can actually use on Monday.
Challenge 3: Build your campus playbook (supporting others)
If you are here to support researchers, your take-home artifact is a reusable playbook, not a single repo. Using the checklist and referral map above as a template, write down:
- The 5 triage questions you would ask of any repository a researcher brings you.
- For each referral category (IP/ownership, sensitive data, institutional repository, OSPO, contested authorship), the actual office or person at your institution it routes to.
- One “I can answer this myself” vs. “I refer this” line you feel least sure about, to follow up on later.
Pair up and trade playbooks: can your partner tell, from your map, where to send a real question? Revise anything that isn’t clear enough to hand to a colleague.
There is no single right answer; the artifact is the point. A strong playbook names real contacts (not just “Tech Transfer” but the office and a link), and is specific enough that another person on your team could use it without you in the room. If you could not fill a referral line, that gap is itself a useful finding to take back.
Going further: the next layer
Citable and discoverable is the foundation, not the finish line. Once
a project has a license, a citation file, and a DOI, the next questions
are about project health: is it secure, maintained, and safe to
build on? OpenSSF
Scorecards scores a repository against those practices and is
becoming a common signal across the open-source ecosystem, though it is
a separate skill from what we covered here. On the credit side, the FORCE11 Software Citation
Principles are the standard the CITATION.cff work in
this lesson rests on. Both are good next stops for anyone building out
an academic OSPO’s teaching.
Resources to Take With You
Lesson Materials
- Lesson repository: https://github.com/UC-OSPO-Network/research-software-citable-discoverable
Tools
- CITATION.cff Helper: https://citation-file-format.github.io/cff-initializer-javascript/
- Zenodo: https://zenodo.org
- Pixi: https://pixi.sh
- Choose a License: https://choosealicense.com
UC-Specific Resources (for UC campus learners)
- UC OSS Chart: https://security.ucop.edu/files/documents/resources/oss-chart.pdf
- UC OSPO License Guide: https://ucospo.net/oss-resources/template-guides/license-guide/
- UC OSPO Templates: https://github.com/UC-OSPO-Network/templates
- UC Open Source Program Office (OSPO) Network: https://ucospo.net/
General Open Source Resources
- Open Source Initiative (OSI): https://opensource.org/licenses (authoritative license registry)
- FAIR4RS Principles: https://doi.org/10.15497/RDA00068 (RDA/FORCE11/ReSA paper)
- Software Citation Principles: https://doi.org/10.7717/peerj-cs.86 (Smith et al. 2016)
- CODE Beyond FAIR: https://doi.org/10.1038/s41597-026-06705-6 (Di Cosmo et al. 2026; covers Software Heritage, institutional roles, and the library’s part in software metadata)
- Software Heritage Archive: https://www.softwareheritage.org/ (universal source code archive; assigns SWHIDs for long-term preservation)
- You’ve successfully made your software FAIR: Findable, Accessible, Interoperable, and Reusable
- Even small actions can significantly improve your software’s impact
- Making code citable and discoverable benefits both you and the research community
- Start with one change, then build from there
- Use the UC OSPO resources and templates to streamline the process